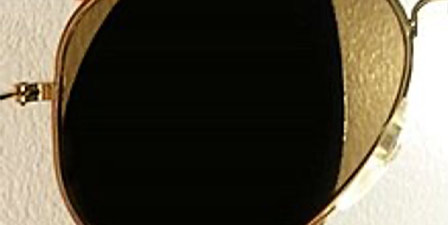

I love manual lensometry. If a fire were to suddenly threaten my boutique, I would grab my favorite vintage specs that belonged to my great-great aunt and my manual lensometer and then I would run for my life.
That being said and after speaking with many of my colleagues I understand that many opticians, both new to the game and those who’ve been in for a bit, want to discuss manual lensometry. They’ve got questions on many fronts; however, one of the questions I hear most frequently involves how to read prism, specifically within progressive addition lenses.
What is The PRP?
So, my first question is, do you know the muffin man? No, sorry. I mean, do you know my little buddy, the prism reference point? When I first asked this question, I was surprised by how many opticians weren’t familiar with this term. Prism Reference Point, or PRP, is the point on a progressive lens that you will use in order to determine if any prism is present within the lens. You can find it on verification masks for all of your progressive lenses, or you can determine by the semi-visible markings on a PAL. You will find that the PRP lives right smack between the watermarks.
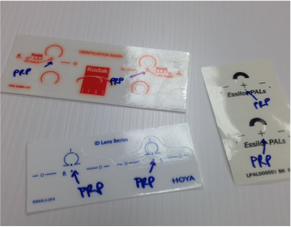
PRP indicated on many common verification masks
How to Use The PRP
So, you know what the PRP is, now, how to apply it. You will want to verify the prescription just like you normally would, checking the distance Rx where indicated based on the amount of drop between the fit point and the PRP; and then verifying the near Rx where indicated based on the corridor length of your particular PAL design. Next, you will want to set the stage on your manual lensometer such that the PRP is right in the middle of your reticle, then, look through your eyepiece, adjust the power drum until the image is clear and determine if the optical image you see is centered on the optical cross or if the image has now moved indicating the presence of prism. It’s always a good idea to write down what you’ve found when verifying your findings at the PRP. (Of course the actual amount of power you see here will be neither the distance or near Rx as you now have some of the intermediate Rx present at the PRP, so don’t worry about the Rx you find here, only the amount and direction of prism.)
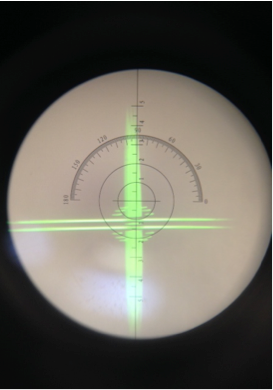
1.25 Diopters BD prism indicated
Accounting for Prism Thinning
It is very common for there to be prism found at the PRP when it comes to verifying progressive lenses. This is because most labs will automatically add “prism thinning” or “equithinning prism” to progressive lenses in order to improve the aesthetics of the finished product. It is important to remember the rules of compounding and canceling prism.
The rules of compounding and canceling prism will help us to determine if the amount of prism found at the PRP is acceptable and within tolerance, or if we should reject the job. Remember that prism that is up and up, down and down, in and out will cancel each other out. Most equithinning prism will be found Base down in both lenses in the same amount in each lens, thus canceling the prismatic effect totally.
Conclusions
The PRP really is your buddy in this instance because it tells you exactly what you want to know. You get to disregard Rx entirely here and check only for amount of prism and direction of said prism. From there, look at the information you collected and determine if it what you found cancels or compounds and then determine if the job passes inspection. So, by looking at the prism reference point as a buddy rather than as an unsolvable equation, you’ll see that mastering the process of finding prism in progressive addition lenses is actually kinda fun!

Johnna Dukes, ABOC is currently the owner and operator of an optical boutique, with experience in both the private practice sector as well as the retail chain setting. She has a wide range of experience varying from optical support staff to dispensary management to practice ownership. She lives in Okoboji, Iowa.