

Sponsored by IOT
By Tina Lahti, ABOC
This article is the first in a series of articles from Tina Lahti, VP of marketing and sales for IOT, and a longtime optician and industry educator. In this series of articles, Tina shares informative tidbits from her course “What Your Lab Wishes You Knew.”
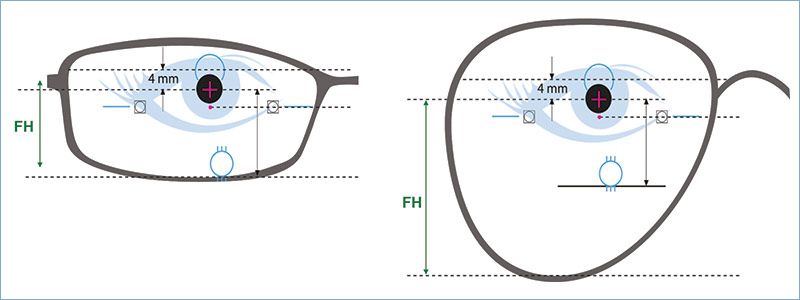
Let’s start with a simple truth: Laboratories make better lenses if you can tell them everything you know about the patient’s frame and how it fits on their face. When I say everything, I mean everything. We understand the importance of providing box measurements to the lab, but these frame dimensions don’t tell the lab the shape of the frame eye wire. Let’s say that the frame is an aviator shape, but you don’t let the lab know this, so what could go wrong? The shape of the frame/lens affects both optics and cosmetics. We know the fitting height for progressive lenses should be measured from center pupil to the deepest part of the frame, but do we know why?
The deepest part of a rectangle frame is directly under the pupil, but the deepest part of an aviator shape frame is somewhere over the patient’s cheek. Imagine you give the lab the ‘B’ measurement of the aviator shape, but they don’t know that it’s an aviator shape. A different progressive design is produced for a rectangle versus an aviator shape. If you’re fitting the patient in an advanced free-from digital PAL, it’s also a totally different progressive lens. As an example, you have a rectangle frame with a 50 mm B measurement and a 20 mm fitting height and the default corridor length, you will get a progressive design with the near power around 16 mm below the fitting height. This will generally be a nice soft design for most patients. If this is an aviator shape, and the lab doesn’t know it, the reading area could be edged off. But if the lab does know the shape, the design adjusts for it. You’ll receive a lens with the near power at 13 or 14 mm below the fitting cross. To the patient, this is a totally different and harder lens design.
Have you ever noticed that some designs come with a bunch of different numbers after them? Do you know what that is? It’s a way for you to have more control over the design of the advanced free-form digital lenses you fit on your patients. These numbers indicate the minimum fitting height options for the lens design. Most designs have defaults that are determined by the information the free-form calculator has access to when it creates the individual design for each patient. But there are also numbers such as 14, 15, 16, 17 and 18 that represent the minimum fitting heights, and each fitting height has a corresponding corridor or progression addition length available for a specific design. This allows you to decide where the reading area will be for your patient. There is one key rule of corridor length that you should keep in mind for your patient, and that is the shorter the corridor, the harder the design. I’m going to say that again because it’s important, the shorter the corridor, the harder the design. There are times when that’s OK. For example, an experienced myopic presbyope might like a shorter design. Perhaps they want to read higher in the lens. Let me tell you, a -8 high myope learned by the fourth grade to turn her head, not her eyes so that she could look through the optically clearest part of the lens. Such experienced high minus lens wearers are accustomed to a little peripheral blur and typically won’t be thrown off their game by progressive lenses. But let’s think about the emmetropes who wait until they have a +2.00 add before they decide to try a PAL. You want that lens as soft as possible. Give them the training wheels. Of course, this is just an illustration, and corridor length isn’t the only consideration. There are also specific designs for these two patients… but that’s another lesson for another day. Join us in next month’s issue of 20/20 Pro to Pro for more on What Your Lab Wishes You Knew.