
SLIT LAMP BASICS FOR THE CONTACT LENS FITTER
By Sam Winnegrad, ABOM, NCLEC
Release Date: May 5, 2023
Expiration Date: May 5, 2024
Learning Objectives:
Upon completion of this program, the participant should be able to:
- Have a solid understanding of the slit lamp
- Comprehend the fundamentals of a slit lamp evaluation.
- Be able to describe the various illumination techniques.
- Be able to identify various fluorescein patterns.
Faculty/Editorial Board
 Sam Winnegrad is a master optician who has instructed anatomy and physiology of the eye as well as other various ophthalmic courses for Roane State Community College in Harriman, Tennessee. He has also taught for Highline College’s online optician program out of Des Moines, Washington. Sam is a technical speaker for the American Board of Opticianry and National Contact Lens Examiners. Sam holds his master’s degree in business administration as well as a bachelors in science - but above all treasures his license to practice opticianry.
Credit Statement
This course is approved for one (1) hour of CE credit by the National Contact Lens Examiners -NCLE, Ophthalmic Level 2, Course CTWJHI112-2
INTRODUCTION
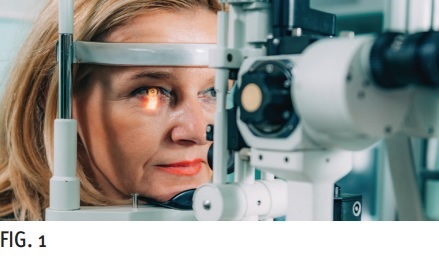
The biomicroscope, commonly called the slit lamp, is an essential piece of equipment in the eyecare practice. Its usefulness in a clinical setting transcends most other ophthalmic tools. The slit lamp is a low-power, binocular microscope with an attached light source. Generally, it is mounted on a small table for portability and easy visibility of the patient's eye and adnexa. It is routinely used to evaluate the overall health of the eyes and to assess contact lens fit, function and viability. The contact lens technician must routinely hone their slit lamp skills which are part art and part science. It is through repetition and experience that one masters the slit lamp mechanics and techniques. There is a difference between the surface-level (no pun intended) slit lamp user and the technician who excels, by embracing the nuances of the instrument. Biomicroscopy can reveal subtle anatomical issues and contact lens contraindications. Proficiency in the use of the slit lamp is a must for the contact lens fitter.
PROGRESSIVE DESIGN: THE PRESENT
Almost by magic, the advent of free form, aspherical lens production technology gave designers and dispensers the ability to tailor various aspects of progressive design to a patient's individual vision needs. For example, the design can be optimized to minimize aberrations based on the fitting parameters, biometrics and the Rx, resulting in wider fields of view. In addition, choosing the ideal lens corridor length facilitates easy access to the lens' distance, intermediate, and near areas. Therefore, selecting the progressive corridor length becomes an important responsibility for the dispenser.
SLIT LAMP HISTORY
The biomicroscope origin can be traced back to the late 19th century when a basic slit lamp design was presented at an ophthalmology meeting in Heidelberg, Germany. In 1891, Rudolph Aubert offered up this new design as a binocular corneal microscope. This initial design was crucial to the development of the modern-day slit lamp, as many of the concepts presented on this early occasion have continued through to modern times-namely, the binocularity and portability of the device. The subsequent notable development was in 1911 when Allvar Gullstrand improved Aubert's slit lamp by adding a controlled light source to the microscope. This significant breakthrough in ophthalmic technology allowed users to generate light beams of varying widths, permitting examiners to define specifics of the eye anatomy and surrounding adnexa. This was a crucial development, as it is not only the microscope of the slit lamp but also the light source that provides the ability to survey the eye adequately. However, it was not until the 1920s that the slit lamp was taught and accepted within the United States. Two gentlemen are credited with teaching the usefulness of the biomicroscope across the states, B. Groves from England and L. Koeppe from Germany. These formidable slit lamp years undoubtedly shaped the history of eyecare as we know it today
GENERAL USEFULNESS OF THE SLIT LAMP
Just as a phoropter is at the heart of ocular refraction, so the slit lamp is at the heart of a comprehensive eye evaluation. The biomicroscope is an exceptionally useful tool for the eyecare professional. It is used to evaluate ocular health and contact lens fit. The standard slit lamp provides a magnification strength of 6x to 40x. This same gentle magnification permits precision viewing of everything from the edge design of a soft contact lens in situ to a visual dissection of the layers of the cornea. In addition, the slit lamp is used to survey the eyes' health, evaluating everything from corneal abrasions to diabetic retinopathy. Not only is the slit lamp a vital tool for eye health evaluation, it is also useful for viewing the ocular adnexa, such as eyelids and lashes. One condition commonly examined with the biomicroscope is giant papillary conjunctivitis (GPC). GPC is associated with a bacterial infection from wearing dirty contact lenses and is characterized by large bumps under the eyelid due to an irritation of the conjunctival membrane. A typical test performed with the slit lamp to determine the quality of one's tear film is called the break-up-time (BUT). This test measures the time between a blink and the creation of a dry spot in the pre-corneal tear film. The BUT test uses a broad beam cobalt blue filter with fluorescein dye instilled in the observed eye. Fluorescein is an orange dye with a yellow-green fluorescence used as an indicator of tear film quality. A tear film that begins to break up prior to 10 seconds is a contraindication for contact lens wear. The slit lamp is beneficial while fitting lenses. It enables the fitter to determine if a lens is properly centered, has adequate movement, is fitting too tight, too loose, or riding high, as well as a host of other characteristics.
BIOMICROSCOPE EVALUATION
Before starting a slit lamp evaluation, a few things must be considered. First, it is important to always clean and sterilize the forehead rest and the chin rest between patients. Next, it is imperative that the microscope is focused. Ensure that the table that the lamp is situated on is at a proper height so that your patient can be comfortable while sitting with their head against the headrest and their chin in the chin rest. They should also be sitting with their back straight. There is an eye level marker on the headrest. When the patient has their head up against the headrest, the outer canthus of their eyes should be level with this marker. It is important to start the actual evaluation with a low magnification level such as 6x or 10x. With a low magnification the user can observe a wider field of view. This is ideal for general surveying of the ocular environment. As necessary, the examiner can increase the magnification to a higher power. This is useful when viewing something of suspicion in greater detail. The examination should also begin with a narrow slit that gradually increases in width as the exam progresses. In general, there will be a 45 to 50 degree angle between the light beam and the microscope itself. Interestingly, it is not the angle of the light source that dictates the type of illumination, it is the width of the beam and where that beam is focused as compared to where the examiner is currently viewing. Most skilled biomicroscope users will make subtle changes to the angle between the beam and the microscope to obtain the best view but will generally stay in the 45 to 50 degree zone. There are exceptions and various techniques that will diverge from this principal, such as while using a sclerotic scatter illumination. Though learning the various illuminations and techniques may be challenging at first, after repetitious practicing it will become second nature
SLIT LAMP ILLUMINATIONS
The type of illumination (Fig. 2) that is used will determine the ability to view various structures of the eye, as well as determine how a lens is fitting.
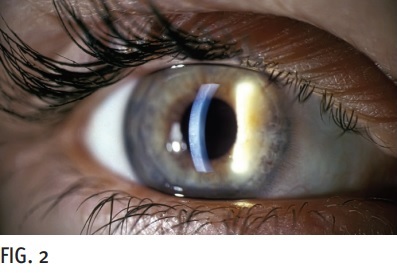
Diffuse illumination n is when the light is spread out over the cornea. This is a wider beam of light than a direct illumination would call for. The benefit of a diffuse illumination is that it gives a wonderful view of the entire anterior surface of the eye as well as the eyelids and lashes. Many corneal issues can be viewed with this illumination such as neovascularization and scarring. It is also useful to view contact lenses that are on the cornea; however, without providing much detail. Another common use of a diffuse illumination is to evaluate the tear break-up-time which demonstrates the quality of one's tear film. More often than not, the diffuse illumination is used at the start of the biomicroscopy exam as a starting point to survey the eyes.
Direct illumination is when the beam of light and microscope are fixated directly on the area that is being examined. There are many subclassifications of direct illuminations, each with its own technique and purpose. Learning how and when to use the different illuminations is critical to one's success as an examiner.
Parallelpiped illumination is the most widely used form of direct illumination. This illumination is achieved by utilizing a 1 to 3 millimeter light beam, with the viewer looking directly at the area of the eye that is being observed. The parallelpiped illumination is incredibly useful for evaluating the fit of contact lenses. This illumination is also commonly used to assess lens movement and centration. Used in conjunction with fluorescein dye, the parallelepiped is also incredibly useful for evaluating how lenses interact with the precorneal tear film while in situ. Many times, the parallelepiped direct illumination is used as a method of discovery and then is followed up with other variations that are used to define the issue that is being observed.
Optic section illumination is a form of direct illumination that uses a very narrow beam of light that is 1 millimeter wide or less. This illumination, just as the name implies, is used to show the different “sections” or layers of the cornea. The five layers of the cornea from anterior to posterior (front to back) are epithelium, Bowman's, Stroma, Descemet's and Endothelium. With this illumination, light enters the eye at a 45 degree angle and can penetrate the layers of the eye to show such deviations as cellular differences, and thickening and thinning of the various layers. The optic section is also quite useful in evaluating the tear layer under a gas permeable lens and aide in the fitting process.
Specular reflection is an illumination that is commonly used to evaluate the endothelial layer of the cornea, and aid in the diagnosis and evaluation of Fuchs' dystrophy. Fuchs' dystrophy is a disease of the cornea in which the endothelial cells die off, and the cornea is unable to properly pump fluids out. A well-functioning cornea is able to maintain a relative state of dehydration. This process is referred to as deturgesence. Individuals with Fuchs' dystrophy can experience cloudy and hazy vision, as the cornea can swell with excess fluid. The specular reflection illumination can provide a detailed view of this phenomenon. Specular reflection is performed by straightening the microscope with the reflection of the light. The patient's focus should dissect the angle that is formed between the microscope and the light source. The specular reflection illumination is usually accomplished with a parallelpiped beam of light of approximately 1 to 3 millimeters in width.
Conical beam illumination is formed when the height and width of the light are brought to a singular circular point of the smallest circumference. It literally forms a conical (cone-like) shape. The conical beam illumination is not generally used in contact lens evaluation, but rather has other important uses. This illumination is used to examine the anterior chamber of the eye. This is the chamber that is formed between the endothelial layer of the cornea and anterior (front) of the iris. The conical beam reveals debris that may be floating in the anterior chamber. It is common to see particles of pigment in this chamber that have separated from the iris. The conical beam is also known as a pinpoint illumination. Due to the small, weaker nature of the light with this illumination it is sometimes used to provide a more comfortable biomicroscope experience for photosensitive patients.
Indirect illuminations are an invaluable addition to any slit lamp repertoire. With this illumination, it is possible to study anatomical structures adjust the light source itself. With the indirect illumination technique, the beam of light is usually 2 to 3 millimeters wide. One of the most common uses of indirect illumination is the viewing of neovascularization, which is the growth of new blood vessels. Interestingly, the cornea is a living tissue, yet devoid of blood vessels which would impede our vision as light enters through the eye for refraction. The cornea rather receives nourishment through the tear film, vessels that end in loops near the limbus and through the process of deturgesence. With indirect illumination, the examiner is able to observe the growth of new vessels that threaten to invade the cornea. Neovascularization may be a tell-tale sign of over wearing, sleeping in or potentially even ill-fitting lenses.
Retroillumination is an advanced slit lamp technique that yields a wealth of subtleties. With this illumination, the user shines a light on either the iris, crystalline lens or retina, and the microscope is focused on more anterior structures. The bright light that radiates from the more posterior structures creates the perfect backdrop to highlight imperfections of the forward anatomy. One of the most ubiquitous uses of this light illumination technique is to shine light on the iris to examine the cornea. Through the use of retroillumination, one can view deposits within the Descemet's membrane. This technique is also used to observe corneal edema. Edema is synonymous with swelling. As the cornea swells, it changes in refractive power and can cause serious visual issues. Retroillumination is also used for viewing any opacities in the crystalline lens. It is also helpful in the diagnostic process when evaluating cataract formation.
Sclerotic scatter illumination is a helpful technique in which the sclera is used as a conduit to send light through the cornea. This is achieved through the process of internal reflection. With this technique, a beam of light 2 to 4 millimeters wide is shone right at the limbus, which in turn brilliantly illuminates the corneal-scleral limbus. The corneal-scleral limbus is the border of the cornea and sclera. Using the sclerotic scatter method is incredibly useful for determining if there are any spots on the cornea that are not transparent. The cornea needs complete transparency as it is the primary refractive medium. Sclerotic scatter also helps detect corneal edema.
SLIT LAMP USAGE WITH CONTACT LENSES

The slit lamp, or biomicroscope, is considered the most crucial instrument by many contact lens practices. It allows for the comprehensive examination of the anterior segment of the eye. The slitlamp is essential for the pre-assessment to determine if contact lens wear is suitable for the patient (Fig. 3). And it is also a vital tool used in aftercare assessment for the existing contact lens wearer.
Diffuse illumination is best for overall illumination for viewing contact lenses in situ. As discussed earlier, diffuse illumination is a wide beam of light used for general surveillance of the ocular environment. It is the ideal illumination for confirming the fit of gas-permeable lenses. And it allows the fitter to assess the lens position, and if there is adequate movement, it is also helpful for detecting lens defects and determining the surface quality and wettability of lenses. When used in conjunction with fluorescein dye placed within the pre-corneal tear film, the examiner can evaluate the quality of the tear film and detect if there is any unwanted debris in the tear film. Diffuse illumination is also used with a cobalt blue filter to view various fluorescein patterns while fitting hard contact lenses
Direct illumination has an array of uses in the contact lens fitting process. Before evaluating the lens in situ, it is used to assess the health of the eyes as well as the related adnexa, including the lids, lashes, conjunctiv, and pre-corneal tear film. Once the patient has been evaluated and qualified as a candidate for contact lens wear, direct illumination can be used in soft contact lens fitting to determine if a fit is too steep or too flat. If there is a large bubble under the edge of a soft lens, the fit is too loose. Direct illumination is also used to detect surface deposits on the lens, and even whether or not the lens is maintaining proper hydration. Direct illumination is used with RGP lenses to determine the fit of lenses with the aid of fluorescein. It is also used to observe any crazing or warping of lenses. One can even view the quality of the lacrimal lens that occupies the space between the lens and the cornea. This is useful to ensure adequate tears under the lens for good vision and comfort. Direct illuminations provide very detailed views as compared to diffuse illuminations, which are not as exhaustive.
Indirect illumination is not necessarily used to survey contact lenses or their fit. It is, however, quite useful to visualize the presence of neovascularization. Suppose a contact lens wearer has new vessel growth. In that case, it is a contraindication for continued wear, or at the very least, it is a time to seriously consider changing the patient's material, modality or wear schedule. Neovascularization can be a sight-threatening condition. Using indirect illumination to detect acute neovascularization can help the contact lens fitter make intelligent decisions about patient care.
One of the most common uses of retroillumination in fitting contact lenses is to detect lens surface deposits. Retroillumination illuminates the deposits from behind, helping to determine their shape and depth. Other uses include viewing the edges of soft contact lenses and observing the cornea for edema.
Not only is sclerotic scatter useful for determining corneal transparency, but it is also useful for determining contact lens transparency, as well as other potential contact lens issues. Some of the more common uses of sclerotic scatter are viewing edge lift on soft lenses, observing how lenses are positioned on the eye and how they move and react to blinking. Sclerotic scatter is also quite useful for detecting corneal edema, or any understated opacities.
USING FILTERS WITH THE SLIT LAMP
Various filters are used within biomicroscopy to improve viewing conditions for specific purposes. Through the addition of these filters, the fitter can enhance their visual experience and provide a more thorough examination. As a pair of polarized sunglasses permits wearers to see beneath the surface of the water, so do slit lamp filters allow the examiner to see a more defined view of the eye. Used under the correct conditions, slit lamp filters can “make the world of difference.”
One of the most popular filters used is the blue cobalt filter. This filter is used in conjunction with fluorescein. The blue cobalt filter animates the fluorescein and causes it to radiate to a yellow-green color. This filter along with fluorescein is helpful in identifying abnormalities within the corneal epithelium. The blue cobalt filter is also beneficial in evaluating the fit of gas permeable lenses.
The Wratten #12 filter is a yellow filter that is used to screen out excessive blue light. It, too, is used in conjunction with fluorescein dye. The Wratten #12 yellow filter will make the fluorescein appear an even-more vibrant green which can be helpful in detecting subtle disruptions.
The most common use of the green filter is for viewing vascularization of the cornea. The vessels will appear almost black under the green light. This filter is exceptionally useful when what would otherwise be understated vessels become visible.
FLUORESCEIN PATTERNS
Using fluorescein with the biomicroscope is one of the best ways to determine the fit of gas permeable lenses. The process involves applying a moist fluorescein strip to the sclera and then having the patient blink. This distributes the fluorescein dye throughout the tear film and beneath the lens itself. When evaluating fluorescein patterns, the biomicroscope should be set to a diffuse illumination with a cobalt blue filter. As a rule of thumb, the more space between the cornea and the lens itself, the brighter green that the fluorescein will appear. Likewise, less space between the cornea and the lens will produce a dimmer luminescence.
There are some standard patterns to expect when fitting gas permeable lenses. The ideal pattern would be an even distribution of fluorescein behind the lens. This is usually only achieved when a spherical base curve is used on a spherical cornea. A steep pattern is indicated when fluorescein pools under the center of the lens. This pattern reveals that the base curve is steeper than K. A flat pattern is indicated when the fluorescein pools under the outer perimeter of the lens. This pattern reveals that the base curve is flatter than K. Fluorescein can also appear under the lens in dumbbell shaped patterns. A with-the-rule fluorescein pattern is present when there is with-therule corneal astigmatism. The flatter area of the cornea appears in a dark “dumbbell” shaped pattern along the 180-degree axis. An against-therule astigmatism pattern would have the dumbbell going in the opposite vertical meridian, where the 90-degree axis is flatter.
Fluorescein staining patterns are vital knowledge for contact lens follow-up visits. Any imperfection in the corneal epithelium will have a much brighter glow. Learning the various staining patterns to look out for can help determine the cause of various issues and determine whether the contact lenses are the culprit.
Stippling are fine groups of small pinpoint shaped breaks in the corneal epithelium. Punctate are larger and more irregularly shaped. Some common reasons for these types of staining patterns are wearing dirty lenses, chemical toxicity or even a poor fit. Any break, scratch or area of erosion is considered an abrasion. Sometimes corneal abrasions are the result of wearing lenses that are too flat, or from wearing lenses that have deposition or foreign bodies attached. Dimple veils have a similar look to stippling stains, but they are essentially indentations in the cornea as opposed to breaks. If dimple veil stains are found in the central zone it may indicate a lens that is too steep. If dimple veiling is in the periphery of the lens, it may indicate a lens that is too flat.
SUMMARY
The biomicroscope is one of the most important pieces of ophthalmic equipment within your practice. Its usefulness in a clinical setting is unmatched. Through this course, the reader will review many of the techniques that are applied during the slit lamp examination, as well as learn their utility and practicality as a contact lens fitter. Having a foundational understanding of the slit lamp, as well as the various accompanying illuminations and filters is essential for a successful practice and vital for the health of your patients. After completion of this course, the student will have a deeper understanding of the biomicroscope.
CONCLUSION
Mastering the art of the slit lamp can only be achieved through dedicated practice. Though at times challenging, learning the nuances of the biomicroscope is essential for any eyecare professional. Proficient use of the slit lamp enables the examiner to survey the health of the eye, evaluate lens fit and provide effective follow-up care. As the contact lens fitter becomes more efficient with the biomicroscope, it undoubtedly translates into a more thorough and comprehensive examination for the patient. Your patients deserve the very best care, and the slit lamp is an integral part of that equation.