

Photograph by BLACK BOX STUDIO Tools: HILCO; Frame: CK Calvin Klein 5154 from Marchon
By Andrew Bruce, ABOM
In their effort to provide patients with the best frame and lens technology, opticians sometimes lose sight of the fact that the eyewear they dispense is onlwy as good as the way it fits the patient. The patient’s satisfaction with their new eyewear depends upon the optician’s ability to pre-fit it prior to taking measurements and then adjust the eyewear to maximize the patient’s vision, comfort and appearance.
 Pre-fit Techniques
Pre-fitting a frame prior to taking measurements has a major bearing on how well the finished product performs for the patient. The pre-fit also provides the patient with their first impression of the optician’s skill level.
There are several steps involved in the pre-fit:
- Adjust the nose pads, if present.
- If a zyl frame without nose pads is selected, make sure the frame sits well on the bridge.
- Make sure the size of frame selected is actually going to work for the lens style prescribed.
- Apply the appropriate pantoscopic tilt (usually 5 to 15 degrees).
Final Dispense and Nose Pad Adjustment
When performing the final fit, place the glasses on the patient in case substantial adjustments are needed. If that’s the case, you can remove the eyewear quickly to avoid a negative impression for the patient.
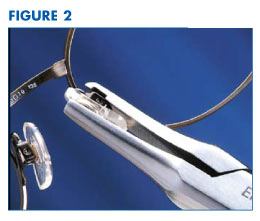
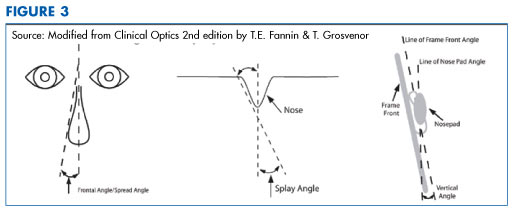
If the frame has nose pads, fine-tune them so the frontal/spread angle, the splay angle and the vertical angle are all correct for the patient. Slim pad arm adjusting pliers (Figure 2) work well for this. The frontal/spread angle is how far apart the pads are. The splay angle is their angle to the nose, which should complement the angle of the nose at the point at which the nose pad is sitting. The vertical angle is controlled by the size of the loop of the pad arm. The standard position requires the bottom edges of the pads be closer to the eye wires than the top edges of the pads. The objective is to make all three angles sit flush with the skin to achieve superior comfort (Figure 3).
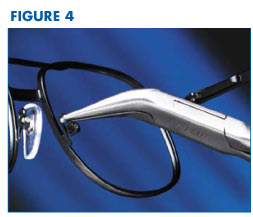 The loop of the pad arm should be small in order to keep the vertex distance to a minimum. When fitting patients with very flat bridges, such as those of Asian ethnicity, frames with nose pads are usually the best option. In these cases, the splay angle has to be changed so the pads are sitting almost parallel to the face. Also, the loop of the pad arm may need to be made larger than standard to keep the frame off the patient’s lower cheeks by changing the vertical angle. Bent snipe pliers are good tools for this purpose (Figure 4).
Adjusting the Frame Tilt
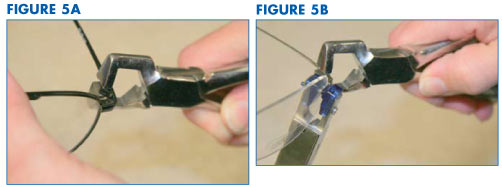
In order to achieve premium vision, the optical centers of the lenses should be horizontally level with the pupils. However, if the eyes are vertically uneven, the patient is not going to be happy with a crooked frame. In a situation like this, try to achieve a compromise. If the frame front is tilted, always correct it in the direction of the error. Use a pair of wide jaw angling pliers for this task to secure the temple and end piece together so as not to put excessive strain on the hinge (Figure 5A and 5B). Example: If the right side of the frame front is tilted down, either increase the pantoscopic tilt of the right side down, or reduce it on the left.
After leveling, verify the amount of pantoscopic tilt is between five and 15 degrees. Have the patient rotate 90 degrees so the angle of tilt can be evaluated from the side. The need to precisely measure the pantoscopic angle is becoming increasingly necessary due to the increased use of freeform lenses. There are PD rulers that display protractor markings, making this possible when necessary.
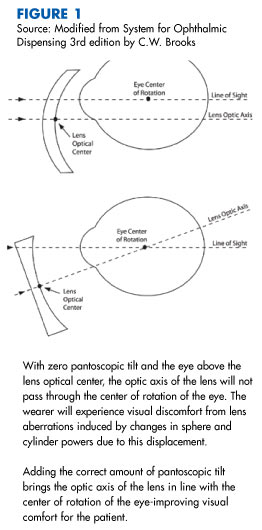
The correct frame tilt is especially important with multifocals, making sure the segment is in the correct position when looking down to read. If there is an insufficient amount, the patient may be looking under the frame, or at least, the field-of-view for near work will be narrowed due to the increased vertex distance between the eye and the segment. As the eyeball rotates around the horizontal axis to look down to read, having the pantoscopic tilt of the frame set at the recommended angle maintains equi-distance between the lens and eye maximizing field-of-view and visual comfort.
Check for Equidistance
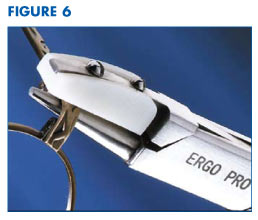 When checking if the lenses are equidistant to each eye, with the patient seated and tilting their chin down, observe the frame front from above by standing and looking down on it. If one lens appears closer to the eye than the other, the patient’s eyes may simply be more inset on one side than the other. Another reason may be due to the temples being at unequal angles to the frame front when extending backwards. Whichever lens is closer to the eye, the same side temple needs to be brought closer to the head by reducing the horizontal angle between the frame front and the temple—using a pair of flat/round metal pliers at the end piece (Figure 6). Conversely, increasing the angle between the frame front and the temple of the opposite side is also an option, effectively moving the temple away from the head.
The same way pantoscopic tilt affects the vertical placement of the lens optical center, face form—positive or negative—will also affect the horizontal placement of the lens optical center. However, it is not recommended to compensate for this since lateral prism would be induced. Applying positive face form so the frame follows the natural horizontal curve of the face is a good rule of thumb.
The Fitting Triangle and Temple Adjustment
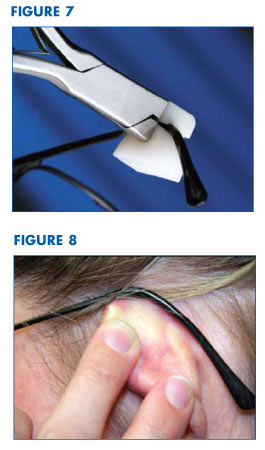 The frame should be touching the head at only three points which form “The Fitting Triangle”—the nose and the top of each ear. When adjusting behind the ears, the temple should curve just above the ears and follow the line of the back of the ear. Temple bending pliers can be used to aid in this process (Figure 7). It should be at an angle of approximately 45 degrees from the temple and it should not put excessive pressure on the back, or top, of the ear (Figure 8). If the bend begins too soon before the top of the ear, it will rub and irritate the top of the ear. If the bend begins after the top of the ear, the temple will either not conform to the curve of the ear, or it will need to be bent at a greater angle than 45 degrees and the tip will rub and irritate the back of the ear.
Regardless of the optician’s skill level, a visual inspection of the temples behind the ears should always be done to ensure optimum comfort for the patient. The temple bend should follow the line of the side of the head. In order to do this the tip will need some angling in towards the head. In addition, the temple tip should not just be touching the head at the top of the ear leaving a space between the head and temple tip at the bottom. Conversely, it should not just be touching the head with the lower tip of the temple creating a space between the head and the temple at the top of the ear. In the first scenario, if the temple is in contact with the head only at the top of the ear, adjust the temple tip so that it angles in towards the head just enough to gently touch. In the second scenario, if there is a space between the temple and head at the bend, adjust the temple tip so that it is not bending in quite so much. Occasionally, in this case, the temple itself may need angling in a little at the end piece, again using flat/round metal pliers to reduce the horizontal angle between the temple and frame-front, in order to provide a snug fit.
Regardless of the technology available to opticians, all is lost if the optician does not possess the necessary fitting knowledge and skills to put the final piece of the puzzle in place. Eyewear fitting is the optician’s specialty and area of expertise and such a crucial part of the entire process.
The steps outlined here may appear time consuming, but with practice and perseverance, they will become second nature and help raise the bar for the standard of care provided.
Andrew Bruce is the optical manager for a private optometric practice in Battle Ground, Wash.