

By Johnna Dukes, ABOC

I recently encountered an interesting situation while working with a new patient. He was a pleasant gentleman who, upon consultation, revealed that he had never been comfortable reading in his progressive addition lenses (PALs). This was his second pair of PALs, and he was wondering if he might need to wear lined bifocals, although he didn’t really want to do that.
The PALs he came in wearing didn’t allow him to utilize the near portion of the lenses. Being curious, I marked up the pair of lenses he came in wearing. To my amazement, everything lined up nicely. Naturally, I dug deeper and asked him to describe what happened when he tried to utilize the near portion. He responded that he didn’t feel like he could use both eyes together. Often, he would have to move what he was trying to read or close his left eye and move his head. My initial thought was that the lenses must be tilted in the frame, which might have made the near portion flare in too far nasally. However, that was not the case. The lenses were perfectly placed, which was when the “aha” moment hit. He was having issues converging at near.
Most progressive lens designs make assumptions about the wearer’s measurements. When specific measurements are not provided, most assume that each eye converges approximately 1.5 mm inward when accessing the near portion of the PAL. In addition, many lens companies already compensate the placement of the near based on the prescription of the ordered lenses. For most wearers, these average measurements will work just fine. In fact, on average, they work incredibly well. However, if you happen to be working with a patient like mine, you need to have a few items in your tool kit to be able to handle the situation I described.
The patient I mentioned earlier was indeed not able to converge at near, so the PAL design that shifted the near portion of the lens nasally by 1.5 mm per eye (for a total of 3 mm) shifted the near too far nasally for him to reach comfortably using both of his eyes together. What he required was a lens that allowed for me, along with the lab, to designate where to put the near in order for him to reach it. Which begs the question: How would you know where to put the near for this client? Answer: You’ve got to measure it. That entails taking both a distance monocular PD (at the infinity setting of your digital pupilometer) as well as a near monocular PD (taken at 40 cm).
Additional things to evaluate at this point involve looking at the frame to determine if it fits within normal levels of face form, vertex distance and pantoscopic tilt, as well as evaluating the patient’s previous pair to determine if the fit of the new ones have similar fitting properties to the old ones, as long as the patient was pleased with what they had previously.
But back to the near monocular PD. In this case, the patient’s near PD was the same as his distance PD. I spoke with my lab and told them what I had experienced. The lab manager recommended a PAL with variable inset which allowed for us to designate exactly where the near should be placed for him, which in this case had 0 inset. We ordered the lenses with the distance PD with the same measurement as the near PD, and voila, this patient left the office very happy. He was able to use his progressive lenses for the first time in his life. The long and short of it is that I now count his spouse, children, parents and many family friends as clients simply because we were able to customize a solution for a problem he didn’t think there was a solution for.
VARIABLE INSET
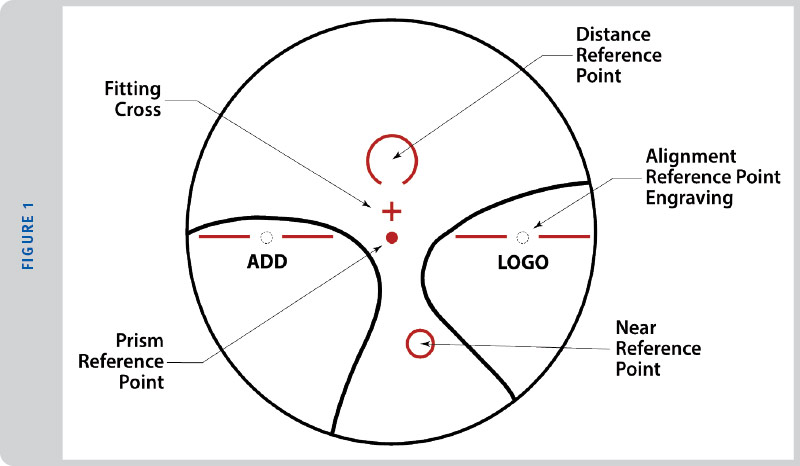
The placement of the near reference point of a progressive addition lens is shifted nasally with respect to the distance reference point of the lens (See Figure 1). The horizontal measured difference of the near vision reference point relative to the distance reference point of the lens is referred to as the inset. As described with the case above, it can be necessary to inset the near portion more or less than the standard based on a patient’s ability to turn their eyes in at near. Just as the patient above didn’t turn their eyes in at near, some patients turn their eyes in more than the standard 1.5 mm per eye at near, and having the ability to place the inset more truly to each patient’s particular abilities can impact the overall comfort the patient experiences while using the near portion of their lenses. As stated earlier, the best way to measure the near PD is to use the 40 cm setting on your monocular digital pupilometer.
VARIABLE CORRIDOR LENGTHS
After learning about variable insets and having the ability to customize lenses, this began my journey into variable corridor lengths. The corridor of a progressive addition lens refers to the channel in the middle of the lens that connects the distance portion and the near portion of a progressive addition lens, the power in the corridor gradually gets stronger the closer it gets to the near reference point. The rate at which the power changes is determined by the length of the corridor itself.
The corridor length dictates how “soft” or “hard” the lens design feels to the wearer. Traditionally, short corridor length produces a lens that feels “hard” to the wearer because it brings the peripheral distortion found in all progressive addition lenses above the 180 degree line, which can make it more noticeable to the wearer. It also makes the change from distance to near power happen more quickly over a shorter vertical stretch. However, it also brings the position of the total near up higher in the lens making the near more easily reachable for someone who does a lot of near work or even for a high myope who doesn’t like to turn their eyes down very far in a lens. (Consider that high myopes generally tend to be “head turners” rather than “eye turners” as their experience wearing glasses has likely taught them to utilize the optical center of the lens as that is the part of the lens that gains clear vision. They tend to turn their head because they’re trying to line up the optical center of their lens with what they’re looking at, so they point their nose at whatever it is they’re trying to see. They’re used to some degree of peripheral distortion in their lenses, so using a shorter corridor lens doesn’t generally create any more peripheral discomfort than they’re already used to dealing with, and it allows them to not have to turn their eyes very far down in order to find the near portion of the lens.) Keep in mind that every action has a reaction, and the reaction you have for shortening the corridor is useable intermediate. For example, by choosing a 14 mm corridor, you will be condensing the intermediate considerably. You would want to be sure you’ve discussed this choice with your patient to determine their need for intermediate prior to making this choice.
Conversely, longer corridor lenses have a “soft” feel to the wearer because the length of the corridor will garner a greater area to push the peripheral distortion lower beneath the 180 degree line. This gives the wearer a greater intermediate viewing area, but sets the near portion lower in the lens. This can be helpful for someone who spends a great deal of time at a computer, or for emerging presbyopes just getting used to PALs, or a wearer who is very bothered by the peripheral distortion of a PAL lens design.
There are lenses on the market that allow for variable corridors as short as 11 mm and some that allow for corridors as long as 18 mm (some even longer), so having an idea of the corridor length a patient is currently wearing will also help considerably when deciding which to choose. And I cannot underestimate how important it is to have a relationship with a knowledgeable lab in order to discuss the parameters of the lenses you are creating for your patient. This relationship can be incredibly helpful in making these decisions.
Some patients you might consider for a more tailored experience are those who have postural limitations, perhaps someone who uses a walker or who tends to hunch over a bit. Or maybe a patient who is very tall might benefit from a lowered fitting height and who might need a customized corridor as they’re used to looking at the world with a slightly downturned gaze.
Having the ability to designate the placement of the inset as well as the vertical height of the near in a progressive lens based on your patient’s needs gives you the ability to truly become an optical tailor. Most progressive lenses on the market today work based on assumed measurements and averages. For most patients, these averages will work. In fact, most work incredibly well. However, on occasion, you may encounter a patient who requires a more tailored experience, and when you take the time to listen to your client’s experiences and take in-depth measurements, you might find success in the utilization of variable insets and corridors. ■
For more information about variable corridors, read “Tips for Using Variable Corridor PAL’s” by Johnna Dukes at 2020mag.com/article/tips-for-using-variable-corridor-pals.
Johnna Dukes is a board certified optician, ABO approved speaker and president of the Opticians Association of America.