

By Johnna Dukes, ABOC
One of the things I love about opticianry is that we get to take a set of plain old numbers from a prescription and turn them into a pair of glasses that our patient will interact with daily. Every detail chosen in the way of frame and lens selection will impact the final product. The difference between a high-performing optician and one who isn’t, is that a high-performing optician can see the finished product before they order it. That’s not because they have telepathy, but because they know which choices will most greatly impact the final product.
Knowing which details impact the outcome most is not so hard. It’s really just a matter of using a systematic process. In frame fitting for a patient with high myopia, it’s a matter of knowing your ABCs.
At the beginning of the new millennium and before the full emergence of free-form technology, the race among competing lens companies was mainly centered on trying to create the best overall progressive. Although this race continues today in the top-tier lens class, these all-purpose designs are now but one part of a multi-level product offering that includes targeted applications optimized for virtually any visual task.
ASK QUESTIONS
A: Asking questions is the most important part of the frame styling process for a high myope. “How bothered are you by edge thickness?” is a great place to start, and there is a myriad of responses to this question. A patient who is willing to stop at nothing to get the thinnest lens is entirely different from one who is less bothered by the aesthetic outcome of thickness, or even one who is more concerned with the price of lenses than they are by the thickness of the finished lenses, but you won’t know which type of patient you’re working with until you ask.
BEVEL SELECTION
B: Bevel selection is something to take into account as part of the frame styling process. Usually this is something not considered until it is time to order lenses, however, with the high myope, you might think about the lens edges much sooner in the process of frame selection. Being able to envision what a particular frame will need in the way of a lens bevel might help clarify the frame choice.
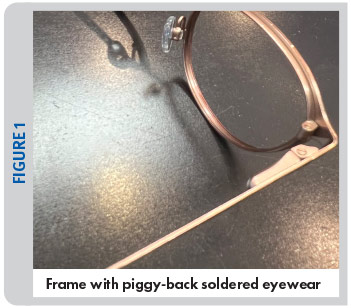
A case in point: When thinking of bevel, one might choose to skip a frame that would necessitate a metal groove when working with a high myope as the frame itself would likely not provide any edge camouflage to the lenses. Additionally, a string-mount semi-rimless frame might not be chosen for a similar reason. Choosing a metal frame with the eyewire soldered piggy-back to the frame front (Figure 1) would necessitate the lab to push the bevel to the front of the lens and would leave the excess thickness to hang off the back of the frame, which isn’t aesthetically pleasing—which is a reason to skip this type of frame for a high myope.
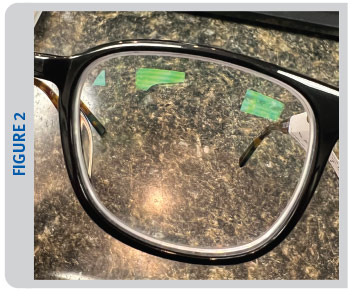
Many high myopic patients choose thicker zyl frames to help camouflage the lens edge thickness, and in a thick zyl frame, the use of a shelf bevel or step bevel can create a visible border around the lens edge, sometimes affectionately referred to as “racoon rings” around the lenses (Figure 2). Sometimes a shallow bevel can help minimize that phenomenon.
CENTRATION
C: Proper centration of the frame is of the utmost importance when styling the high myope. Fortunately, there are so many shapes that are “on trend” right now that make centration much easier than when the only shape anyone wanted to wear was a large, oversized rectangle. A round frame will yield a thinner edge profile than a rectangular frame will, even if looking at frames of the same size; also, you might avoid an aviator shape with a longer effective diameter (ED) which will also create more edge thickness than what is desired.
Don’t forget that centration isn’t only found in the A-box meridian. Make sure to take the B meridian into account too. I’ve witnessed what can happen when choosing a frame with too long of a B-measurement had created a thicker and heavier end product than what the patient was happy with. Remember, the patient can’t visualize the end product. Of course, that frame looks great on them with a plano demo lens. However, the finished product can be something totally different if we don’t pay attention to the details.
DESIGN
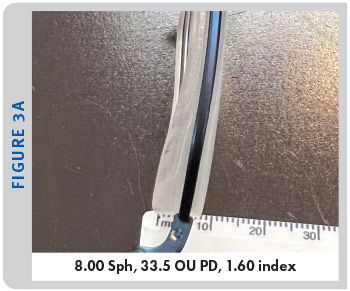
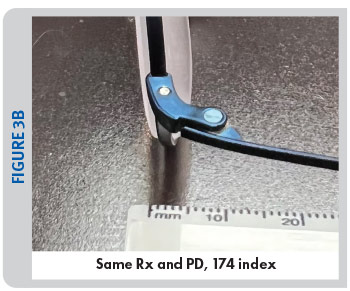
D: Lens design is the next thing to consider when looking at options that give the most desirable outcome for the high myope. Many things fall into lens design, and lens index is a big part of this discussion, although aspheric and lenticular designs can also fall into this category. Everyone knows the adage the higher the index, the thinner the lens, however, there are some caveats to consider here,
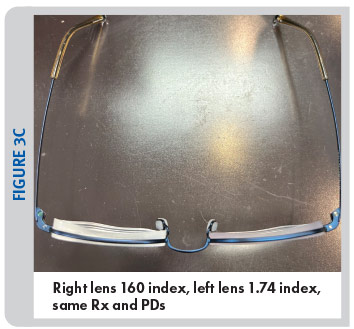
including durability of ultra hi-index products, Abbe values, etc. Usually, I will refer to a lens thickness calculator (Figures 3A, 3B, 3C). (Most labs have one or you can find them online. Or you can run the math yourself using the sag formula.)
Aspheric lens design has been available for some time. However, it isn’t always the first thing we think about when offering certain lens designs. Aspheric lenses can be very helpful in decreasing the minification effect that is often experienced when looking at the wearer through their lenses. By flattening the curves of the lenses, we can not only reduce the edge thickness, but we can improve the aesthetic for the wearer because their eyes won’t appear to be as reduced in size as you look at the wearer.
Aspheric lenses are available in a multitude of options, from single vision to progressive lenses. A notable new lens is the MySV from Hoya Vision Care. This lens incorporates aspheric and atoric curves which can drastically improve the aesthetic of the finished lens edge, but better than that is the enhanced visual experience for the wearer. It incorporates free-form technology and design compensation to correct oblique or off-gaze aberrations that can be found in traditional spherical lens designs. The lens also uses Listing’s Law in order to calculate and compensate for how the position of wear as well as the eye’s axis of rotation will affect the prescription in areas of the lens outside of the optical center. The use of this type of lens often gives the wearer a feeling of a much wider field of vision relative to the traditional spherical lens design.
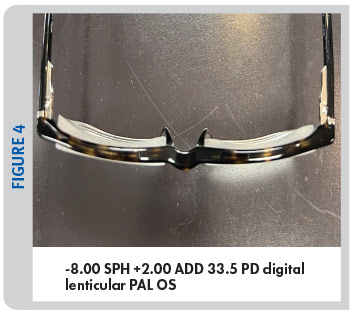
In a case of what was old is new again, lenticular lens design is emerging back on the lab scene. Although lenticular design has been around for ages, it was traditionally used sparingly and most often in very complicated Rxs and less as something that would be offered as a more mainstream option until recently. There are some labs who are doing great work with digital lenticular design in the way of blending the center usable portion of the lens with the less usable carrier part of the lens, keeping in mind that the vision in the carrier portion is not true, it is more for aesthetic appearance. These new digital lenticular lenses are not your mother’s lenticular lenses, the aesthetic is much better without having a visible carrier and in other good news, these lenses are more cost effective than previous lenticular designs (Figure 4).
When it comes to designing an outcome for your patient, don’t forget you may have the opportunity to fully customize a lens in a drilled rimless chassis that you can call the shots on (if you work with a lab that allows those options.) What I love about these is that you can design the A-box measurement, B-box measurement and shape. This could be a game changer for high myopes.
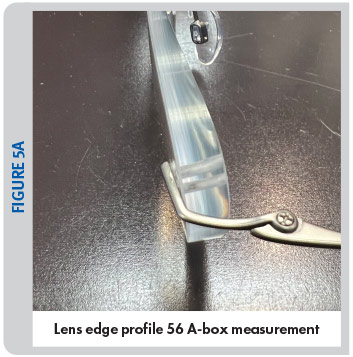
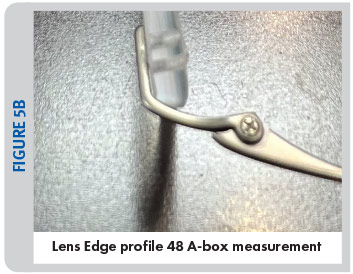
The photos show the same Rx (-5.75 -0.25 x030 OD, -4.75 -1.00 x150 OD, +2.50 ADD), first photo shows a drilled rimless with 56 A-box measurement (Figure 5A), the second shows the same Rx made in a 48 A-box measurement (Figure 5B).

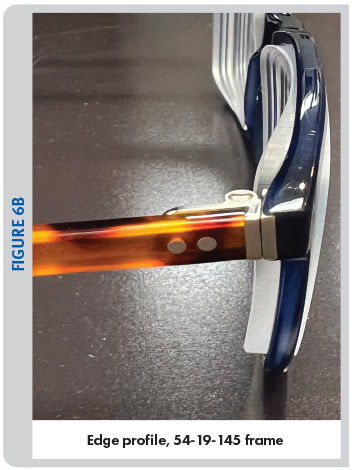
Also just to illustrate my point, let’s consider that we have a -8.00 SPH OU patient whose PD is 30/30. Let’s say they first choose this rectangular zyl frame that has measurements of 54-19-145. Let’s do some rough math and take half of the A and add that to half of the DBL to get the frame PD, which in this case would come to 36.5. The patient’s PD is 30, so you would first be looking at 6.5 mm of decentration. Yikes! Here is what the finished edge profile of that order would look like (Figures 6A, 6B).
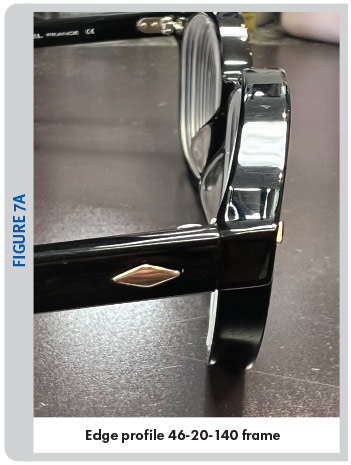
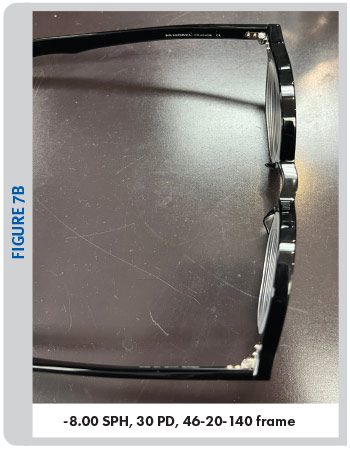
Let’s say instead we counsel the patient to choose a frame that would better center their eye. With the guidance of a high-performing optician, the patient instead chooses a round frame with measurements of 46-20-140. Again, taking half of the A and adding that to half of the DBL, now you’ve got a frame PD of 33, and with a patient’s PD at 30, now we’re looking at 3 mm of decentration. Here is what the finished edge profile of that order would look like (Figures 7A, 7B). Which do you think the patient would be happier with?
Taking the time to find out which things are most important to the patient and ensuring the proper lens and frame choices are made can help to make those numbers on a page into a physical thing that your patient will be proud to put on their face every day.
Special thanks to Eye-Kraft Optical for the photos used in this article.
Johnna Dukes is a board certified optician, ABO-approved speaker and president of the Opticians Association of America.