
This part one of three articles is from a CE course of the same title: Coping with Corridors by Barry Santini and is available at http://www.2020mag.com/ce/TTViewTest.aspx?LessonId=111755
Learning Objectives:
Upon completion of this program, the participant should be able to:
- Understand what opportunities are present for specifying progressive lens corridor lengths.
- Know when a specific corridor length is required.
- Learn the lenses and options when a specific corridor length is a requirement.
INTRODUCTION
In the new millennium, as free-form manufacturing overcame the economic and logistic limitations imposed by traditional progressive production, a cornucopia of lens design choices unfolded on the optical market. Through software-based, free-form design, manufacturers could now offer lenses of variable design priorities, where the optician could now specify not only which utility area was most important, but also the length and even slope of the progressive corridor. And the most advanced designs featured a variable corridor, which would individually tailor the progressive to fit the chosen frame. However, this approach can come with a downside, with patients sometimes encountering difficulty adjusting to different reading levels resulting from the design software adjusting corridor length differently between smaller dress and larger-sized sunwear styles. The challenge to be taken up by today's optician is to recognize how much more involved they need to be in designing lenses that will satisfy the expectations of their customers.
OLD VERSUS NEW CHALLENGES
Since the introduction of Varilux, the first progressive addition lens in 1959, eyecare professionals have faced numerous challenges in learning to fit these types of lenses. Clearly, success with progressives has always been about obtaining a type of magical balance between sometimes conflicting elements, including acuity, comfort, utility, perceptual and postural adaptation, in addition to business concerns centered on price and perceived value.
Until recently, ECPs have lacked the ability to tailor specific or overall aspects of a progressive lens' design, including its basic design philosophy, i.e., merit weighting of aberrations, surface astigmatism, power errors or corridor length. Consequently, they had resigned themselves to the reality that obtaining patient satisfaction would be limited only to manipulating height, design, add power or specific brand. Progressive lens fitting was seen as a risk-filled and serendipitous endeavor, often accompanied by expensive trial and error lens remakes and loss of patient trust.
Today, the advent of free-form lens production technology has now given ECPs tools that had previously been strictly within the province of the original lens designer. The proper use of these tools — most importantly the ability to specify progressive corridor length—now requires eyecare professionals to possess an in-depth understanding of the interplay between the eye's natural reading level preferences, lens fitting parameters, individual prescription values and critically, even the design n goals of the lens itself. Therefore, it is essential for ECPs to comprehensively understand the history, design, vocabulary, definitions, fitting concepts and Rx considerations involved in the fitting of progressive lenses, and the impact that choosing the ideal corridor length has on improving satisfaction, increasing trust and elevating your professional credibility in the eyes of your client.
THE CHALLENGE OF PROGRESSIVE DESIGN
Although the invention of progressive addition lenses was first described in 1907, another 50 years would pass until Bernard Maitenaz of Essel, a forerunner of Essilor, engineered a way to commercially produce progressive lenses. Even as the hurdles of making lenses with a seamless transition between distance and reading were overcome, European opticians —long trained to prize optical quality above everything else — found themselves reluctant to embrace a new lens technology that appeared to increase optical errors rather than decrease them. In the first decades of progressive development, lens designers found that the easiest way to decrease surface astigmatism and distortion was to spread out the progressive gradient by making the progressive corridor as long as possible. This is the origin of why many ECPs favor longer corridor designs. But two problems can accompany this approach: 1. The reading level can end up uncomfortably low, and 2. Different frame "B" sizes may result in different reading levels. Here, wearers often experience discomfort and adaptation problems switch between pairs. This is, in fact, a problem we often encounter today. The defacto challenge facing progressive design was thus defined: How do we strike the optimal balance between comfort, acuity and utility for each prescription, wearer and frame style? The answer begins with defining a common, working vocabulary of basic progressive terms and fitting concepts.
UNDERSTANDING PROGRESSIVE BASICS
Unlike bifocal lenses, which have only two zones of vision and a sharp line marking the border between them, progressive lenses have many reference points that need to be considered.
Below are the major cardinal points common to every progressive lens and their respective definitions:
Fitting Point:
The reference point at which the design's fitting cross is placed. The common orthodoxy is to place the Fitting Point at the center of the eye's pupil while the patient's facial plane is in their natural position, i.e., normal posture. Often overlooked is that the progressive power gradient, i.e., the corridor, just begins its slope at the Fitting Point. In the most modern designs, this change is slow for the first 2 to 4 mm.
Major Reference Point (MRP):
These are the lens designer's points of reference for optical calculation and alignment. The MRP is also the point for measuring prism in both an unmounted lens and a finished pair of eyewear. Some brands refer to the MRP as the PRP or Prism Reference Point.
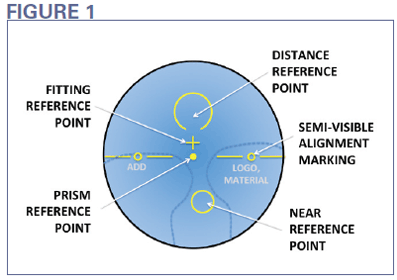
Alignment Reference Markings:
These engraved reference points, 34 mm apart, 17 mm each side of the MRP, are used for aligning the progressive lens during finishing, as well as for verifying correct prescription axis and placement in a pair of finished eyewear.
Progressive Drop:
The distance between the Fitting Point and the MRP/Alignment Reference Marks. This value varies between different manufacturers and even different designs within a manufacturer's lens portfolio. It can range from 0 to 6 mm, with 4 mm being the most commonly encountered value.
Near Reference Point:
The area outlined for verifying the reading Rx power.
Distance Reference Point:
The area outlined for verifying the distance Rx power, generally located approximately 4 mm above the Fitting Point, providing an area completely free of the progressive power gradient.
FITTING CONCEPTS IN MODERN PROGRESSIVES
Below are the definitions and fitting concepts needed to be understood by ECPs in order to fully grasp the mechanics of defining and choosing corridor length:
Corridor Length:
The linear distance between the beginning of the power gradient —the Fitting Point —and the target add value, most commonly defined as 85 percent of add power.
Target Add Value:
Variably classed as either 85, 95 or 100 percent of the prescribed add value, depending on the design. Manufacturers are free to define corridor lengths using either of these target add values. It is therefore important to contact the manufacturer and learn which value they use when you are comparing corridor lengths between different designs. Rule of thumb: Add approximately 2 mm to the corridor length of an 85 percent target add value design when comparing corridor lengths with a 100 percent target value design.
Minimum Reading Area:
Experience has shown that a progressive reading area should be a minimum of 4 mm to 5 mm in height. Many traditional short corridor designs may provide as little as 3 to 4 mm, which can result in compromised utility and comfort in the reading and intermediate areas.
Minimum Fitting Height:
The distance from the Fitting Point to the center of the reading area. Depending upon the manufacturer or design, targeting the Minimum Fitting Height can truncate up to half of the available reading area. A general recommendation is to choose a frame that allows the addition of between 2 mm and 4 mm to the Minimum Fitting Height. Doing so will ensure the wearer has
the minimally-comfortable reading utility.
 Barry Santini, ABOM, graduated from New York Technical College in 1975 with an AAS in Ophthalmic Dispensing. He is a New York State licensed optician with contact lens certification, is ABO certified and was awarded an ABO Master in 1994. As sales manager for Tele Vue Optics from 1987 to 2003, Santini developed his knowledge of precision optics and has been an owner of Long Island Opticians in Seaford NY, from 1996 to present. Recently The Society to Advance Opticianry named Barry Santini, OO, as the 2016 Ophthalmic Optician of the Year. In addition, Santini is an amatuer astronomer and lecturer and plays bass trombone in the Brooklyn Symphony.