
By Barry Santini
For over a century, corrective eyewear was made using only measurements taken by hand. All that was considered necessary to craft a quality pair of glasses was a simple pupillary distance and height. These were routinely gleaned with just the use of a millimeter ruler and a practiced eye. At the end of the 19th century, where the most sophisticated lens design was a mildly curved form called meniscus, there was no need for penlights, pupillometers, corneal reflexes or a recognition to mind such things as lens decentration or pantoscopic tilt. Glasses were fitted “on-PD”—that is, the eye size plus the bridge size pretty much equaled the wearer’s anatomical PD. Things couldn’t be simpler, and basic measurements were more than sufficient for these unsophisticated times.
Today, to say that both frame fashion and lens design have evolved is a significant understatement. Frames are taller, wider, tilted and wrapped to far more of a degree than the basic requirements of vision correction would dictate. Lens design has progressed too, beginning with the introduction of best form/corrected curve lenses in the 1920s, through progressive lenses in the 1960s, to the complex and comprehensive optimizations made possible using personalized measurements combined with real-time optimization of free-form lenses. To this end, the new digital centration systems—aka the DCS—have come to market offering the promise of precise measurements that will represent the ultimate in correctness, convenience and confidence. So why would the use of measurements taken by hand, an over 100-year-old modality, continue to make sense today?
A HANDS-ON APPROACH
Just as no one would reasonably argue that the skills of learning to add, subtract, multiply and divide are obsolete in an age where calculators are never more than inches from your fingertips, we cannot fully appreciate and trust the measurements gleaned from a digital centration device if we have not first mastered the art of taking proper measurements by hand of PD, height, pantoscopic tilt, frame wrap and vertex distance. And while a digital centration system, or its newer cousin—the digital centration tablet app—when used in the hands of a skilled operator, delivers on its promise of precision, accuracy and patient impression, there are still distinct reasons why eyecare professionals should master manual methods of measurement.
A Tactile Understanding: Learning manual measurements is analogous to taking a lab in biology class. There’s nothing better than a hands-on approach to help you visualize exactly what’s going on. In our profession, where “knowing your optics” is a coveted accolade, learning through visualization is simply common sense.
Enhanced Customer Contact Points: A contact point is defined as the place where an exchange of information occurs between the customer and a business. Telephone, e-mail, social media and in-store interaction are but a few examples. Where eyewear is concerned, contact points may include: reception desk, exam rooms, frame displays, waiting areas and dispensing desks.
Besides the exam room, the next most intimate contact point exchange takes place at the dispensing desk, where the patient and eyecare professional are also in close proximity to each other. Taking measurements by hand can only enhance this intimacy and further build upon trust between both parties. Beyond just PDs and heights, obtaining values for pantoscopic tilt, wrap and vertex distance provides an important opportunity for the ECP to describe the “why” behind these new measurements. Patients are often heard exclaiming: “What’s this? You’ve never done all that before!” This is the perfect opportunity to spend the time further explaining the advantages of lenses that employ personalized measurements. Contact points like these are much of where the impetus builds for a client’s Facebook “Like,” a positive Yelp review or good old-fashioned word-of-mouth—all-important, business-building aspects in the arena of social media.
Sense of Natural Posture: One of the most important factors for eyecare professionals to ascertain is determining just what best represents a person’s “natural” head posture. Although most ECPs can agree on what represents a level, erect and upright head posture, the influence of habitual postural deviations on the net tilt of the lens plane is important in getting the best out of real-time lens optimization. Here, the gold standard we’re seeking is trying to ascertain the combined interactions of head, neck, shoulder, back and eye alignment, and determining how the resulting sum affects the intersection of the primary gaze with the plane of the eyeglass lens.
Simple and Easy Verification: Taking measurements by hand allows an ECP to enjoy the advantage of a complimentary action: verification by hand of those same measurements. Whether you are performing a fitting at eyewear delivery, during a request for a preferential realignment, or while troubleshooting visual complaints, the advantages from mirroring the same modality used when the initial measurements were taken translate into increased convenience and practitioner confidence.
WHAT LENS DESIGNERS NEED TO KNOW AND ECPS NEED TO FIND OUT
Before the dawn of real-time lens optimization, where integrating personalized position of wear measurements into the lens designing process wasn’t possible, lens engineers were faced with the challenge of trying to determine, in advance, precisely how the wearer’s line of sight would intersect with the lens plane. Although it was easy to assume that the horizontal location of the optical center would be adjusted for PD, the final vertical location often depended on the unknown interplay of frame depth, pupil height and the fitter’s compliance with proper corrected curve principles. In addition, not having personalized measurements resulted in lens designers having to accept performance compromises resulting from using a statistical average for the following position of wear values:
Pupillary Distance: Defined as the distance between the visual axes, or lines of sight of the eyes. Historically, PD was considered the sole benchmark measurement essential for fitting a pair of glasses properly. Typical binocular values range from 56 mm to 72 mm, but children can be as low as 32 mm, and wide-eyed adults can range up to 78 mm. Monocular differences can be as great as 4 mm, essentially negating the benefit of using a binocular PD for real-time lens optimization.
Pupil Heights: Traditionally considered only when fitting progressives, pupil heights are essential for the complete optimization of all types of lenses, including free-form single vision and conventional multifocals. Pupil heights, more than any aspect of eyewear other than prescription, can dramatically influence eyewear’s total comfort, utility and acuity:
- Utility—The utility of reading areas for both progressives and bifocals depends in large part on knowing how to place them optimally for each patient. Too low or too high, and the results are decreased utility, acuity and visual comfort. Effective utility is influenced by the interplay of an individual’s head posture, previous wearing habits and appropriateness of the prescription.
- Acuity—Related and interactive with utility, with both constructive and deconstructive outcomes.
- Comfort—Essentially an amalgam of acuity, utility and delta, or degree of change, all single vision, multifocal and progressive lenses are ultimately described from the wearer’s point of view in terms of how comfortable or uncomfortable they are.
Vertex Distance: Although VD is a value that ECPs can tangibly measure and is defined as the distance from the corneal apex to the back vertex of the lens, what lens designers are really after is the distance from the back vertex of the lens to an individual eye’s center of rotation, of which vertex distance is one part. Researchers have found that the center of rotation of ammetropic eyes generally varies directly with the amplitude of refractive error and inversely with its sign, and can range up to 2 mm from the emmetropic mean. Vertex distance values can range from 11 to 18 mm, but you may encounter values as close as 5 mm or as long as 22 mm. A nominal vertex value is considered to be between 13 to 14 mm. While ECPs have been historically taught that the importance of vertex values lies in compensating powers over 5 diopters for the difference between exam and eyeglass, its significance in the optimization of free-form lenses is actually something quite different. Vertex values, along with the location of an eye’s center of rotation distance, influence lens mapping, where frame shape, size and pupil position help feed the designer’s optimization program with the information necessary to sculpt the best vision possible for these individual fitting values.
Pantoscopic Tilt: Defined as lens tilt around the horizontal, or x axis, with respect to the primary gaze angle. Pantoscopic tilts within the range of 3 to 7 degrees are considered normal. While ideal compliance with best-form fitting principles may allow conventional, spherical single vision lenses—those without appreciable astigmatic correction—to deliver good acuity when fitted using Martin’s Rule of Tilt, acuity is often compromised if the eye’s gaze angle intersects the lens more than 7.5 mm from optical center placement. Off-axis errors, which include unwanted astigmatism and power error, are further compounded with the presence of astigmatism and any unaccounted for deviations in lens tilt with the eye’s primary or off-axis gaze. Pantoscopic tilt values typically range from 0 to 12 degrees, but negative values—called retroscopic tilt—and significant tilts of as much as 18 degrees are possible. The actual value found depends on the interplay between a frame’s inherent pantoscopic angle (the angle between frame front and temple), ear placement and habitual head or neck posture, as mentioned above.
Panoramic Angle: Defined as lens tilt around the vertical, or y axis, with respect to the primary gaze angle. Panoramic angles within the range of 0 to 5 degrees are considered normal for fitting purposes. Unlike pantoscopic tilt, panoramic angle—also known as wrap angle or face form angle—is not accounted for within best form fitting principles. Until the advent of real-time optimization with free-form lenses, lens designers rarely considered panoramic angles exceeding 7 degrees. Today, with the visual benefits and fashion of wrap sunwear well-established, panoramic angles of 12 to as much as 25 degrees are not uncommon.
HANDS-ON, NOT MINDS OFF
The essentially empirical approach of obtaining measurements by hand should not lull an eyecare professional into a slumbering, repeatable routine, because hands-on measuring facilitates seeing a more complete story of a patient’s natural posture. While patients follow your directives during the measuring process, ECPs can view the virtual video of postural responses that unfolds, rather than just the simple snapshot of a digital centration system. For example, asking a client to look at you can be accompanied by a significant tilting back of their head. If the amplitude of their response is large, this may correlate with exaggerated head tilt while driving, and require a discretionary adjustment be made to the height of a progressive or multifocal lens. This should be appropriately recorded on the patient’s record.
DON’T MAKE PERFECT THE ENEMY OF GOOD
With all the gray area that can surround securing a precise fitting value for personalized measurements, it can be easy to abandon even attempting to master obtaining values by hand, and find yourself basking in the comfortable wisdom of “if it ain’t broke, don’t fix it.” Even if the values you obtain are only repeatable with one or two units, it’s important to not let missing perfection become the enemy of trying to obtain basic, good measurements. Using personalized measurements means not having your patients settle for compromises in comfort, acuity and utility arising from using averaged measurements, or worse—older, less sophisticated lens designs. Encourage all the dispensers in your office to invest the time to master the art of measuring by hand. By doing so, not only will your office significantly reduce its redo rate, your patients will enjoy all the benefits that accompany measuring twice and cutting once.■
“Memo on Understanding the Position of Wear” by Darryl Meister, ABOM, manager, technical marketing, Carl Zeiss Vision, was a source of technical information for this article. It is available at: opticampus.com/files/memo_on_understanding_the_position_of_wear.pdf.
20/20 contributing editor Barry Santini is a New York State licensed optician based in Seaford, N.Y.
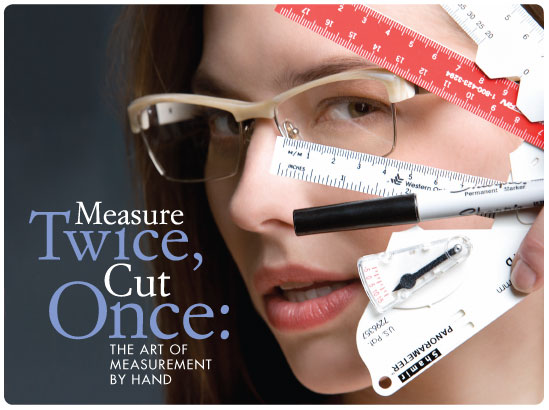
Taking Measurements Manually
One of the first things taught to novice opticians is how to take a binocular PD with a millimeter ruler. But we're in an era that's about to be ruled by digital centration devices and tablet apps, so how much useful information can be realized from such an elementary method? In a word, plenty. Let's take a look at how position of wear fitting values are obtained through measuring by hand:
PUPILLARY DISTANCE
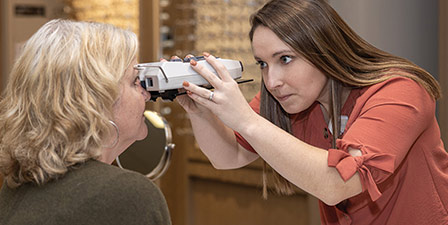
The ECP aligns himself approximately arms-length away from the patient, while lining up his sighting eye directly over the subject's eye. Ask the wearer to fixate on the sighting eye of the ECP.
- Binocular PD with Ruler Alone
- Pupil to pupil center
- Iris to iris edge
- Canthus to canthus
- Binocular Distance PD with Ruler or Penlight
- Pupil to Pupil center
- Corneal Apex to Corneal apex: The advantage here is that the reflection off the corneal apex—the corneal reflex—more closely represents the eye's visual axis or primary gaze and is typically displaced nasally from the geometric center of the pupil.
- Subjective Binocular Near PD with Mirror
Sometimes called the Mirror Method, the following is a subjective method used to determine the intersection of the visual axis for near in the actual plane of the frame being fitted. (Thanks to Laurie Pierce of the Optical Program of Hillsboro Community College.) Here are the steps:- Put the PAL markings on the lens.
- Place the mirror (approximately 8 inches square) in the middle of the dispensing table, flat.
- Place a dot in the middle of the mirror.
- Have patient look at the dot with their eyewear/demo lenses on.
- Carefully mark the demo lens on the patient while looking in the mirror. This gives you the exact location of where they converge to read. This will require practice, as it is tricky marking the lenses. It's similar to a dentist, working upside down and backwards in a mirror.
- Monocular PD with Penlight
With the actual frame, complete with lens templates and fully fitted, the ECP uses a marking pen to dot the corneal reflex for each eye. Care must be exercised to avoid parallax or wearer fixation drift. This method has the additional advantage of compensating for any lack of assumed symmetry between the centerline of the frame and its alignment on the wearer's bridge.
Using a pupillometer, which most eyecare professionals employ today, lies between the manual and digital centration camps.
PUPIL HEIGHT
The ECP uses the actual frame, complete with lens templates and fully fitted, and a marking pen to dot the pupil center or corneal reflex for each eye. Care must be taken to have the wearer assume as natural a posture as possible. It is recommended that the ECP observe the patient’s posture before and after the measurement, as well as while standing and seated. Individual discretion in modifying this measurement is encouraged if the ECP observes notable postural deviations.
PANTOSCOPIC TILT
Using a method similar to the one above for pupil height, first the ECP marks the pupil with the wearer’s posture as relaxed and natural as possible. Then, while looking from the side, help the wearer modify their head angle until the plane of the frame front is perpendicular to the floor. Mark the pupil for this position as well. Now, using Martin’s Rule of Tilt in reverse, measure the distance between these two marks. Multiply by two and you have determined the effective pantoscopic tilt. Various plumb-style devices are also available to measure pantoscopic tilt.
VERTEX DISTANCE
As in measuring for pantoscopic tilt, keep the wearer’s frame front held perpendicular to the floor, and use either a distometer or a ruler to measure from the corneal apex to a point directly opposite on the back of the template or lens’ surface. This method is the proper way to obtain vertex distance by hand.
PANORAMIC ANGLE
When done manually, determining a frame’s panoramic angle is the only position of wear measurement that is not performed with the frame on the wearer’s head. Using either a protractor or a similar tool, such as a panoramic gauge, the panoramic angle is essentially “eyeballed” by sighting a line, or chord, across the nasal and temporal outer limits of the eye wire. Visually extending this line to the reference scale allows determination of the wrap angle.
Another useful tool for measuring panoramic angle is the Panorameter by Shamir, which actually measures effective wrap at the PD. To distinguish its values from the more traditional ones gleaned with a protractor, its measure value range is adusted to lie between 90 and 120 degrees. It is important to not simply subtract 90 degrees from its found values and try to input Panorameter measurements into a conventional lab order. The augmented value range tells the lab you employed a Panorameter.
—Barry Santini