
Photograph by Black Box Studio
By Palmer R. Cook, OD
We all want our patients to be pleased with their appearance in new eyewear, yet the end results do not always meet our expectations. Since eyewear covers 25 percent or more of the face and masks the most expressive part of our appearance, our eyes, is it any wonder people are sensitive to the way they look in new eyewear? Your challenge is to give patients the best combination of “looking good” as well as “seeing well” in new eyewear. Experience and intuition can lead to good cosmetic results, but there are also some important guidelines to help you achieve a “look” that patients will appreciate without sacrificing eyewear performance.
The four attributes of lenses that most affect appearance are: edge thickness, magnification/minification, curvature and reflectance.
 Edge Thickness
Lenses with thick edges, especially lateral edges of about 5mm or more, tend to attract attention and detract from good appearance. Usually minus lenses are considered when edge thickness is discussed, but occasionally stock plus uncuts are edged down for small eyesizes and this leaves the patient with unnecessarily thick and heavy lenses.
Clinical Tip: For moderate to strong plus prescriptions that are to be mounted in small eyesizes, insist that the lab surface the lenses rather than using uncuts to avoid the weight, magnification and thickness issues.
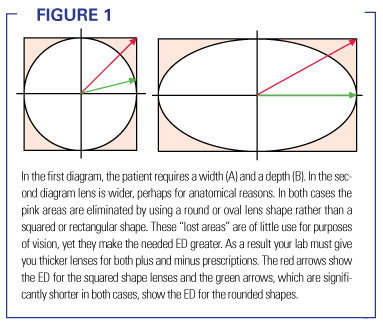
To reduce edge thickness in minus lenses, strive for little or no decentration, smaller eyesizes, materials that can be surfaced thinner such as Trivex or poly, and consider using aspheric designs. Using a higher index material to decrease thickness is most effective over about 5 diopters of power and when designs with larger effective diameters must be used. The effective diameter of any lens shape is the distance from the center of the lens to the furthest edge.
Clinical Tip: As the power of the prescription becomes greater, the lens shape that will give the best cosmetic results will usually become closer to a circle or an oval. (See Figure 1)
Magnification/Minification
The amount of magnification (or minification in the case of minus lenses) has relatively little detrimental effect on the appearance of eyewear except in very strong powers and when the phenomenon of facial inset occurs with minus lenses.
Facial inset is the inward displacement of the face due to the minification effect of minus lenses. It is worse with longer vertex distances and it is directly related to the amount of base out prism in the lateral periphery of the lens. Facial outset is the outward displacement of the face due to the magnification of plus lenses and it is also worse with longer vertex differences. It is most noticeable when patients turn their heads a few degrees to the right or left.
Facial outset is still relatively rare, but since high-plus lens can be made thinner and lighter it is becoming more common. Facial outset can be seen in the classic movie “A Christmas Story,” where the main character, Ralphie, wears a moderate plus lens correction. Ralphie’s eyewear is, as it should be, about as wide as the widest part of his face. Because of this when he is looking directly into the camera the facial outset is not apparent. When the camera shot passes through the lens lateral to the optical center and on to the edge of Ralphie’s face the facial outset is apparent. The effect would be much greater if the lenses were a higher plus power and/or if the lenses were wider, especially if they extended wider than his face.
Facial outset was largely avoided in the past because dispensers were sensitive to the excessive center thickness and weight increase caused by fitting high-plus lenses into large eyesizes. Now high-index lenses and aspheric lens designs permit the design of larger lenses in the high-plus powers without the massive increases in thickness and weight of the past. Even though new technology makes it possible to use larger lenses for hyperopic patients, the increase in size should be done with moderation.
Facial inset is most apparent when viewed from directly in front of the patient and facial outset is usually most apparent when viewed at a somewhat oblique angle.
Clinical Tip: Facial inset and outset problems cannot be completely eliminated, so you may wish to caution patients that when they are photographed the camera position should be carefully chosen. Because both inset and outset problems are related to the amount of prism in the lateral periphery of the lens, it is important to use a frame that requires little or no decentration. Also the eyesize of the frame should be kept as small as practical. Some wrap can be induced when fitting the frame to further reduce these problems, but it is important to make the same modifications to power and Rx PD that you would make with any wrap frame. In very high powers only minimal amounts of wrap are practical.
Curvature
Corrected curve lenses were developed to give better optics when the line of sight passes peripherally through the lens. Aspheric lens designs are used to reduce peripheral aberrations even though a flatter lens design is used. Typically, flatter, aspheric lens designs have thinner edges and shortened vertex distances. This improves appearance and widens corridors and reading areas for PAL lenses. The most cosmetically undesirable effect of flattened curvatures is related to front surface reflections. Curved reflecting surfaces make light sources smaller and visible over a wide viewing angle. Flat reflecting surfaces do not minify the image of the light sources they reflect and are visible at a “direct bounce” angle. Occasionally movie directors put evil characters in lenses with plano front curves. They then bounce light from the lenses into the camera to obscure the actor’s eyes and make him more threatening at strategic moments. Since the wider use of high-index, aspheric lenses, this effect can be seen more frequently among commentators, experts, political pundits and newscasters on TV. For patients with these kinds of duties, excessive flattening of the base curve may not be a good choice.
Reflectance
The use of anti-reflective lenses improves performance and appearance. Performance issues aside, the use of AR makes eyes more visible, eliminates the “glassy” appearance of mid- and high-index materials, and it makes the lenses less visible. It can almost be like removing the lenses but leaving the prescription in place. AR also reduces the prominence of the “bulls-eye rings” of myopia. It should be remembered that every problem related to reflected light is reduced by the use of anti-reflective lenses. This is true for every lens material and every prescription, although the benefits of AR are exponentially greater for higher index materials.
The color, shape, size and design of the frame also affect the finished appearance of your patient’s eyewear. Carefully selecting the right combination of each is important. Sometimes patients “economize” by trying to make one frame meet all of their eyewear needs. Results of this “averaging” are, at best, average from both a performance standpoint, as well as in terms of appearance. Most patients have specialized sports footwear, work footwear and several choices of dress footwear. You may want to point out that trying to make one design do everything is even more futile with eyewear than it is with footwear.
Color
The patient’s complexion and wardrobe preferences should always be considered when selecting the material and color of the frame. Style conscious patients will usually be able to make appropriate choices in color and texture of frame materials. You should have sample lenses available to demonstrate and compare the various colors of AR with both patient complexions and possible frame choices. Fashion-conscious patients should be encouraged to return with different make-up and favorite apparel before making a final frame selection. Patients whose wardrobes are mostly in the gray-blue tones usually look better with similar frame color tones or in silver metallic frames.
Shape
Square, rectangular, round, oval and triangular (base down or up) are the basic facial shapes. Usually, but not always, a lens shape that loosely mimics the facial shape is a good choice. Patients with oval facial shapes are fortunate in that they can potentially wear almost any basic frame shape. Those with facial shapes that are strongly square, rectangular, round or triangular usually do not look good in frames that too closely mimic their facial shape (e.g. round lenses on a round face can look “cartoonish”). On the other hand, round lenses on a rectangular or square face can often look out-of-place.
Patients commonly make the mistake of looking at their appearance in various frame styles from a too-close position to a mirror. It is easier to judge the appearance of a frame from a distance of 10 to 12 feet. Because of this patients should be encouraged to “step back from the mirror (refractive error permitting).” Assisting family members or friends can help best if they stay back and view the trying on of frames in the mirror but from several feet away.
Clinical Tip: The nasal edges of the eyewires should parallel the nose. If the angle of the bridge flares too much, the nose may look longer and narrower. If the angle of the bridge flares too little, the end of the nose may look more prominent. If the frame has a fixed bridge, too much bridge flare can cause pressure marks to appear high on the sides of the nose, while insufficient bridge flare can put pressure too low on the nose and interfere with breathing.
Size
Frame overall width should be about the same as the width of the patient’s face. The B measurement of lenses should generally be greater for long faces and shorter for round or square shaped faces. The patient’s PD should be equal to or 1 to 3mm less than the frame PD (i.e. the sum of the eyesize and bridge size). The width of the front should generally permit the temple to go straight back to the attachment of the external ear to the skull with the temples at approximately right angles to the front.
Design Nuggets
The following tips can help you achieve the best look and fit for your patient’s new eyewear.
- Use turnback temples to make the overall width of the eyewear wider while keeping the lens size smaller.
- Use a lens shape that allows the nasal side of the lens to parallel the nose.
- For patients that would benefit by a wider appearing PD, use a frame with more decoration around the temple attachments and as plain a bridge arrangement as possible.
- For patients with exceptionally wide PD and a relatively narrow face, use a frame with a more complex bridge and with temple attachments that are as simple as possible.
- Use frames with fronts that are thicker (front-to-back) to disguise the thickness of higher minus lenses.
- Use frames with fronts that have wide eyewires to minimize lens size (and thickness) for both higher plus and minus lenses.
- Because a shorter vertex distance minimizes both facial inset and outset, consider using a frame with high temple attachments. This allows more of the lens to swing back toward the face when pantoscopic angle is added and reduces the magnification/minification phenomenon.
- Patients who have deep-set eyes and “balcony brows” may benefit from using a frame with lower temple attachments because this allows the top of the frame to swing outward at the top. This may permit you to move the frame closer to the eyes for better optical performance and appearance.
- Using a frame with the bridge attached higher will tend to make a too-short nose look longer.
- Using a frame with the bridge attached lower will make a too-long nose look shorter.
- Using a frame made from heavy stock works best for patients with large, coarser features.
- Using a frame made from thinner stock usually words best for patients with delicate features.
- Generally frames should follow the line of the eyebrows and should be at, or slightly below the level of the eyebrows.
- It usually is not a good idea for the top part of the frame to cut across the brow, leaving some of the brow above the frame and some showing through the lenses.
- Thicker, darker frames usually work best for patients with heavy eyebrows.
- For most facial shapes the centers of the eyewires should fall at about the base of the pupils with the patient’s lines-of-sight straight ahead and level.
- For long, rectangular faces, a deeper eyewire shape can give a good cosmetic appearance, but the MRPs may have to be raised well above the mounting line (i.e. half way from the bottom to the top of the lens) to be positioned appropriately.
- A heavy or ornamented bridge will tend to make an unusually wide PD appear narrower and a simple, delicate bridge will tend to make a narrow PD look wider.
Design Analysis
Asking a patient what they liked and did not like about previous eyewear can help pin down what they find appealing in terms of eyewear appearance, as well as performance. Below is an example of how a careful analysis of lens and frame considerations can yield better eyewear appearance and performance.
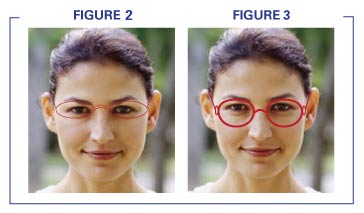 In Figures 2 and 3, patient’s Rx is -4.75DS in both eyes. She has a rectangular facial shape, a relatively narrow PD and a long nose. Her upper lip is somewhat short and this makes the length of her chin from the lower lip downward to appear longer. In Figure 3, the eyewires are thin and delicate, which will make the thickness of the lateral edges more apparent. The temple attachments are very simple, which, coupled with a decorated bridge, would make her narrow PD even more evident. The high placement of the bridge accentuates her long nose. The lens shape is shallow (i.e. the B measurement is relatively short compared to the A measurement) and this further accentuates her long face, long nose and relatively short upper lip.
The frame simulation in Figure 3 uses a thicker eyewire to hide some of the lateral edge thickness and to prevent the brows from showing below the eyewire. The bridge is narrower and this, along with the reduced A measurement, means the frame PD will be closer to her anatomical PD, so less decentration will be needed and the lateral edge thickness will be reduced. The B measurement is increased and this makes her long facial shape less noticeable. The bridge position is lower to disguise her long nose. The bridge is simple and the DBL is narrower, these changes, coupled with some decoration at the temple attachments, helps give the appearance of a wider PD. Rolling and polishing her lenses will make the thickness of the lateral edge of her lenses less noticeable and make bulls-eye rings (not shown) of her myopia less prominent. Using both a light tint and AR lenses will further attenuate the bulls-eye rings. The MRPs are high and as a result the edge thickness at the bottom of the lens could be a problem. The roll and polish makes it less likely that her cheeks will touch the bottoms of her lenses when she smiles. The frames also have a low temple attachment, allowing the top to swing outward a bit and the bottom to swing inward less when pantoscopic tilt is added. Turnback temples could be used to keep the eyewear about as wide as her face while allowing a smaller eyesize to be used. Setting the vertical MRP position a bit lower than normal would help with the edge thickness at the bottom.
Prescription Considerations
The MRP is the point, and the only point in the lens that gives the exact prescription. As the patient’s line-of-sight roams away from the MRP, lens performance deteriorates. The area around the MRP, which does not interfere with clear, comfortable vision even with prolonged viewing can be thought of as the “sweet spot” of the lens.
The sweet spot tends to enlarge as adaptation to the new lens occurs. This enlargement is limited by the lens design and by the patient’s tolerance. The sweet spot also varies according to visual demands, lighting and pupil size at any given time. The sweet spot tends to be smaller for stronger prescriptions, higher index materials and aspheric lenses. If the MRPs are placed somewhat lower to minimize the lower edge thickness for the frame on the right, then care must be taken to minimize anything in the lens design that could make the sweet spot smaller. If the new MRP placement is lower relative to the pupil than the MRP placement in the previous eyewear, the patient may feel somewhat taller in the new eyewear because of an increased base up prism effect when viewing straight ahead. Fortunately, this effect will pass within a day or so of wearing only the new Rx.
If the presciption was -4.75 -2.00 x 090, the design problems at the bottom (and top) of the eyewire would be much as described above because the power in the vertical meridian would still be -4.75. The lateral edge thickness would be greater however. If the axis of the cylinder was 180, then the power in the vertical meridian would be -6.75 and the design challenges would be greatly changed.
The correct choice of frames should leverage the advantages of today’s lens technology. Although ophthalmic technology offers many terrific options, if used inappropriately they can yield increased cost with little patient-perceptible improvement in appearance and disappointing results in visual comfort and performance.
Palmer R. Cook, OD, is director of professional education for Diversified Ophthalmics in Cincinnati.