
By Mark Mattison-Shupnick, ABOM • Photograph by Iris Johnson
It seems odd to think we need to know more about fitting lenses that are personalized. After all, as opticians, we’ve always fit lenses in a “personalized” way. We know how to take monocular PDs and fitting heights, consider optical center height placement in large frames and in prescriptions more than 7D, and we were taught to consider the effective power (vertex) of the final eyewear. Isn’t that personalized enough? Not any more. Not if you’re switching patients to the newest personalized lenses.
First, as an optician who has been fitting lenses since 1968, I am proud of the way I fit lenses (as I’m sure you are, too). In fact, with either a penlight and millimeter ruler or pupillometer, I successfully fit almost every patient the first time. I say almost since nothing is 100 percent and sometimes either the patient or I wasn’t clear in assessing an actual need or want and I got it wrong. Success though, was only a redo away. So, why is it different today?
Simple. This new technology re-designs the lens for each wearer incorporating as much fitting data as we might supply. It puts new fitting demands on the optician. That’s nothing that we can’t handle as long as it makes sense.
Why should personalized lenses be even more perfect than before? The answer is that new personalized lenses are designed individually using fitting and frame data along with the prescription. Unlike standard lenses, where the same lens design is used for every patient regardless of the way the lens is worn (think -4.50-1.50x85 finished single vision lenses), each lens is newly designed. The design incorporates different asphericity for each of the lens’ power meridians. The same is true for progressives, a -4.50-1.50x85, add +2.00, in the same lens brand has been delivered the same regardless of how the lenses were worn. However, the Rx affects the design as does the frame chosen and the way it fits. It’s individual. Therefore, it stands to reason the design should change based on “wear.” This delivers the Rx the same as it was written (not altered by a fixed progressive design or changes to the wearing position).
 All this means that more than just the central lens power is changed based on the wearing characteristics. The overall lens design is altered. In single vision lenses, it makes a real difference and, for the most part, was unavailable before. In progressives, it fixes the way the Rx affects the basic design. Therefore, it makes sense to include them if personalizing lens designs for wearers.
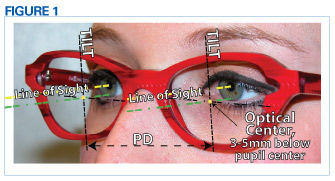
A great pair of glasses requires lenses be correct technically. That means the lenses and the eyes work together seamlessly. Eyes must have excellent binocularity (correct PD and height), the prescription must be correct, frames properly aligned, with a snug and comfortable fit. Finally, the lens surfaces are clean and crisp. (Figure 1)
First, binocularity is the most important reason why lenses are loved or rejected. Think about binoculars. The first thing adjusted even before focusing is aligning each of the telescopes with each eye to match your own lines of sight for one binocular image, not two. It’s the same with eyewear. If not aligned properly they can’t be worn.
Personalized PDs
PDs by millimeter rule are the most inconsistent and create the most errors. A millimeter rule with a nasal cut for monocular PDs and a penlight to highlight the corneal reflex along with very good technique can do a better job but requires skill. Therefore, use a pupillometer. It minimizes errors and also reduces the variability from optician to optician.
New digital camera systems have been shown to provide PDs with the least errors. They’re more expensive but over time, considering remakes and employee turnover, they become quite a good investment. Also, the technology has been proven in many offices so it’s time to consider them.
 Technique
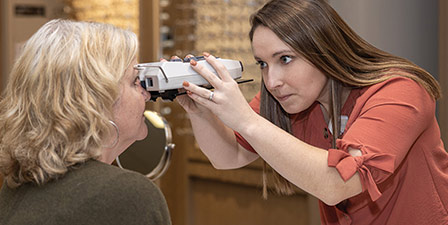
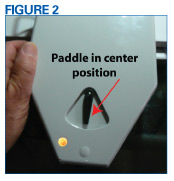
Set the pupillometer paddle to the center to allow both eyes to view the pupillometer target. This is the way that patients use their eyes, i.e. together. It delivers monocular values while the eyes are used binocularly. This also allows for any slight head rotation that is normal in most patients. For stability, be sure that you and the patient hold onto the pupillometer when taking measurements. Take measurements a second time just to be sure. A second time suggests precision and care. If you do it a third time, the patient will begin to think you don’t know what you are doing. (Figure 2)
 Personalized Height
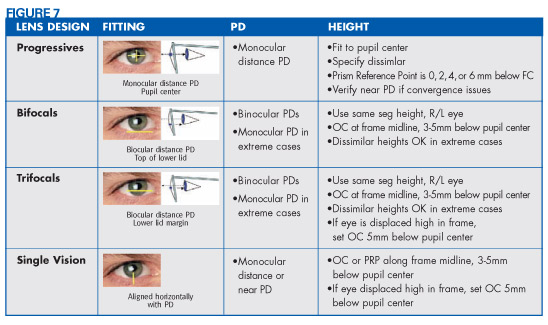
Fit personalized progressive lenses at the pupil center. This is true for all personalized lenses (at least so far). Since the lens designer assumes that the lens will be fit at pupil center, all of its design attributes radiate from here.
For personalized SV and multifocals, the lab’s design software system determines the position of the optical center (OC) or prism reference point (PRP) relative to the height of the pupil and any segment top. In addition, many personalized lenses incorporate equi-thinning (also called prism thinning) so there will be vertical prism used to reduce any vertical lens thickness differences. If no prescribed prism or equi-thinning is present, the PRP will be the optical center.
PRP/OC location vertically considers the pantoscopic tilt, B dimension of the frame and pupil height. Typically the requirement is to have the lens’ optical axis pass through the center of rotation of the eye. So, for frames that are typically tilted (7 to 12 degrees) the PRP/OC will be located below the straight-ahead line of sight (about 1mm lower for every two degrees of tilt).
As opticians, we rarely think about vertical OC height since normal frame tilt and the way that frames fit patients gets it about right, all the time. Look at the next 10 patients. Their eyes are usually 3 to 5mm above frame “B” midline, yet the lens OC is at the midline. If frames are tilted 7 to 10 degrees, it’s correct (about 1mm lower for every two degrees of tilt). It can make a vision difference when a patient’s eyes are very high in their lenses, much like a pair of big sunglasses. So, take a pupil center height for all personalized lenses ordered and add it to the lab order.
 Personalized Prescriptions
A personalized prescription, prescribed in 0.25D steps, may be returned from the lab as an Rx in 0.01 diopters and different from what was ordered. That’s because the power of the lens is being adjusted for the additional fitting data of lens vertex, pantoscopic tilt and wrap angle. These three measurements are also called the “position of wear.” The lens prescription will not be different when worn, just when verified on the lensmeter. Why is it different and how should I prepare for questions about the difference?
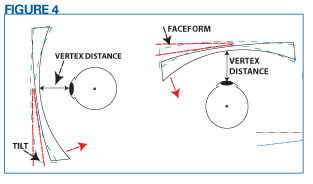
Changes to vertex, tilt and wrap (position of wear) change the prescription and the design of the lens from the design that the doctor and manufacturer intended. The lens designer uses a set of default values for the average position of wear when creating the design. If the lens will fit differently, the Rx and design are tweaked to actually deliver the correct prescription and design. (Figure 4)
If the lens being ordered happens to fit the same as the default values, no new measurements are required. Specify position of wear values when they are different from the default. Therefore, know the default fitting values of the personalized lenses that you use.
Position of Wear
Measure tilt, vertex and faceform and supply these values to the laboratory for personalized lenses and they will compensate the prescription. The compensated Rx is checked in the lensometer while the Rx from the doctor will be the one “seen” by the patient with lenses on.
 Pantoscopic Tilt
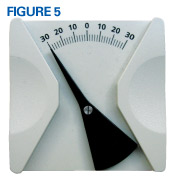
Measure pantoscopic tilt using a Zeiss gauge or Shamir Panorameter. This requires that the patient is standing with normal head posture. For plastic and metal frames, remove the plano inserts and place the gauge against the top/bottom of the eyewire. Read the angle at the point of the arrow. (Figure 5)
 Vertex Distance
Measure vertex distance using a millimeter rule or Zeiss gauge. This is the distance from the front of the eye to the back of the lens. A good approximation is using the patient’s existing eyewear (about the same shape lens). Sight the distance from the front of the cornea to the front of the spectacle lens (it’s often difficult seeing the back of the lens) and subtract lens thickness. Determine wrap or faceform angle using a Shamir Panorameter or a protractor. (Figure 6)
Actual vs. Measured Rx
Are you altering the Rx when delivering personalized lenses that measure differently from the prescription? I’m asked this question often. No, the patient “sees” through the prescription as it was written. It has been adjusted for the change to its effective power and design that different Rxs and fitting positions create. So, it measures differently only on the lensometer.
Be sure to provide patients an office card with the two Rxs so that if you filled the Rx from another office, and if the patient returns to the other office to have the glasses checked, you don’t receive the complaint “my doctor’s office checked these glasses and they are not what was prescribed.”
Fitting Two Pairs
When fitting two pairs of glasses—say a smaller ophthalmic pair and a larger/deeper Rx sunglass—keep in mind the following when using personalized progressive lenses:
1. If there are two different fitting heights, say 17mm for the regular pair and 24mm for the sunglass, consider informing your lab to use similar corridor lengths in both pairs. This will avoid avoid having the reading zone too low in the sunwear if the progressive corridor is lengthened to match the frame depth.
2. Overall, keep in mind corridor length is now an available fitting choice that ECPs can use to help clients who are used to shorter corridor lenses from having habituated to smaller, compact frames (tip courtesy of Barry Santini).
Base Curves
With personalized SV and progressive, the lens design can achieve best form performance across several base curves. Take a look at the frame’s base curve, which is the curve of the eyewire (not to be confused with the frame’s wrap angle). For best fit, request a base curve close to the frame’s base curve. If that’s not possible ask the lab to match the bevel apex curve to the eyewires base curve. This will ensure perfect fitting lenses and more comfortable fitting frames, the same as the plano place holders in the frame.
Fitting Steps to Success
Starting tomorrow, sell a pair of personalized SV or progressive lenses and follow these fitting steps.
1. Take Monocular PDs
2. Consider OC/PRP height
3. Adjust the frame, adjust the frame, adjust the frame (Oh, did I say that? Adjust the frame to the patient before taking the rest of the measurements)
4. Determine fitting height (dissimilar for progressives and SV)
5. Measure pantoscopic tilt
6. Measure vertex distance
7. Determine wrap or faceform angle
8. Order personalized SV or progressive lenses