Understanding and Working With Toric RGP Lenses
By Christopher Miller, ABOC, NCLEC
Release Date: April, 2013
Expiration Date: September 28, 2017
Learning Objectives:
Upon completion of this program the participant should be able to:
- Understand the features and differences of the three standard RGP toric lens designs.
- Know when to use each design.
- Learn how to use a radiuscope and lensometer to identify each design.
Faculty/Editorial Board:
 Christopher Miller started at SOLA Optical USA in 1977 as the Quality Control Department lead manufacturing CR-39 lenses. After several optical courses, Miller became an optician at a retail chain, passed both the ABO and NCLE exams, managed optical locations and then opened his own optical boutique. In the Caribbean and South America he helped several doctors open practices and ran the government of Guyana's optical business. In 2002, he returned to California and now works at a busy HMO as a contact lens fitter.
Credit Statement:
This course is approved for one (1) hour of CE credit by the National Contact lens Examiners (NCLE). Course CTWJM546-2.
 RGP toric lenses are indicated
for high amounts of prescription astigmatism, high corneal
toricity or when a smaller diameter or other parameter is needed. They are
not readily available in a soft lens design
such as a steeper or flatter base curve.
RGP toric lenses are indicated
for high amounts of prescription astigmatism, high corneal
toricity or when a smaller diameter or other parameter is needed. They are
not readily available in a soft lens design
such as a steeper or flatter base curve.
However, identifying when to use each of the different RGP toric designs can be difficult, especially for the new contact lens fitter. This course will clarify the different lens designs, suggest when a particular design is indicated, list the order of frequency of usage and ways to identify each type of lens.
DESIGNING AND ORDERING LENSES
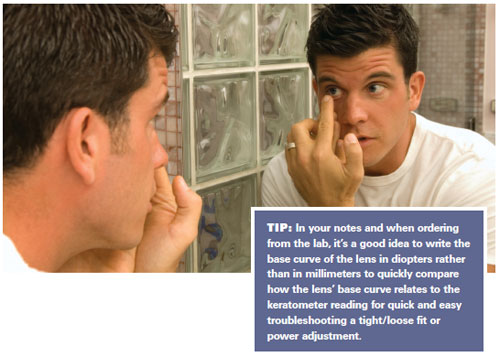
Remember to always have the prescription in minus cylinder form and to correct for vertex distances for both sphere and cylinder powers for powers above ± 4.50 power. Things can get tricky when designing for a monocular fit or when over-refracting so write calculations down a step at a time and always double check your work before ordering.
In the following examples, for simplicity, we'll use a 9.2 mm diameter for all lens designs. However, as you know in the real world we must carefully consider the size of the cornea, previous lens size if any, fissure opening, lid attachment, etc., and adjust accordingly the diameter, sagittal depth or base curve (BC) when needed.
EVALUATION STEPS
- Review the prescription. Put in minus cylinder form and correct for vertex in both meridians.
- Review the keratometer (K) readings.
- Compare the cylinder power of the prescription and the corneal toricity from the keratometer readings.
Is there less than 3.00D of corneal toricity? If less than 3.00D, can a spherical design lens work?
When over 3.00D corneal toricity, determine the location; is it on the cornea or is it residual? You will know it is on the cornea if the value of the keratometer readings is close to being equal to the prescription cylinder correction. Subtract K from the prescription cylinder. If the cylinder correction on the prescription is equal to the difference in the K readings, it then follows that the base curves, which are on the concave or backside of the lens, will need two curves to match the shape of the cornea. If the cornea is spherical or only has a small amount of toricity, then it is considered residual astigmatism, and the correction (two curves) will be placed on the front of the lens.
We will begin by looking at spherical/single cut designs. This is the lens designed and dispensed the most, followed by the three different toric designs in the order of frequency of usage.
BASIC RGP DESIGNS IN THE ORDER OF FREQUENCY OF USAGE
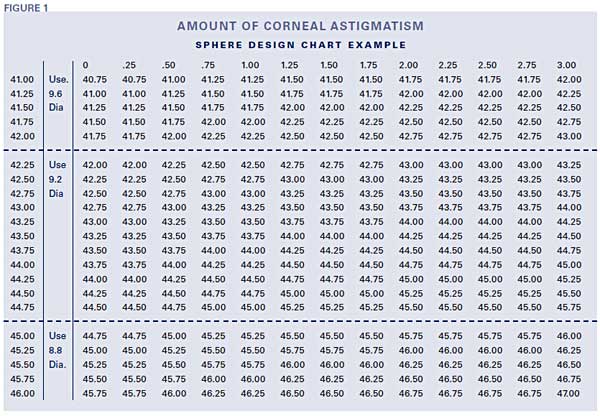
Sphere/single cut: The spherical or single cut lens design is for spherical and sphero-cylinder prescriptions with up to 3.00D of corneal toricity. This contact lens design has only a spherical power and one base curve. The lens is typically designed steeper than the flattest corneal curve to create enough of a tear lens layer to correct up to 3.00D of prescription cylinder power. Request a chart from your lab that shows the BC and diameter to order as the sagittal depth changes with each diameter (see sample chart). Fitters certainly become familiar with these over time, making designing lenses an easy task.
Directions:
- Determine the amount of corneal cylinder by finding the difference between both K readings.
- Find the flattest K reading in the left hand column.
- Follow across the horizontal column to the corneal cylinder listed at the top of the chart.
- Base curve to use is listed in the column where the two intersect.
- For final lens power, add minus 0.25D sphere power for every 0.25D the base curve is steepened from the flattest K.
- Use the base curve listed.
- If the cornea cylinder exceeds 3.00D, consider a bitorc design.
- Use this chart as a guide for selecting the first base curve to try. Analyze lens movement, centration and fluorescein patterns to determine the need for a different fitting lens.
EXAMPLE
Prescription: OD -2.50 sph
OS -2.25-1.00x180
K readings: OD 44.25/44.50
OS 44.25/45.25
Lens design considerations
(from Fig. 1 below):
OD Fit 9.2 Dia. +0.25 flatter than flattest K
OS Fit 9.2 Dia. -0.25 steeper than flattest K
Lenses ordered:
OD 44.00, 9.2, -2.25D sphere
OS 44.50, 9.2, -2.50D sphere
BITORIC LENSES
 Bitoric: Use this lens design when there is
over 3.00D of prescription cylinder and
most if not all of it is from corneal toricity.
Bitorics aren't hard to design when you
think of them as two spherical designs on
one lens; +0.25 flatter for the flatter K and
+0.75 flatter for the steeper K.
Bitoric: Use this lens design when there is
over 3.00D of prescription cylinder and
most if not all of it is from corneal toricity.
Bitorics aren't hard to design when you
think of them as two spherical designs on
one lens; +0.25 flatter for the flatter K and
+0.75 flatter for the steeper K.
EXAMPLE (RIGHT LENS ONLY)
Prescription: OD -3.50 -4.50 x180
K Readings: OD 43.00x180/47.50@090
4.50 D Corneal Toricity
Vertexed power @12 mm:
-3.50/-8.00 = -3.50/-7.25
Lens ordered:
OD -3.25/42.75 -6.50/46.75 9.2 dia. Blue
Front Toric: This lens design is used when there is over 1.25D of prescription cylinder correction with a spherical or near spherical cornea. This lens is ordered with a cylinder power and axis. To prevent the lens from rotating, the lens is ordered with a prism base down to act as weighted ballast or stabilizer. A prism of usually 1.5Δ base down will keep the lens from rotating. The lens is also dotted at 6 o'clock for diagnostic purposes when dispensing and for evaluations at later visits. The lab will do the dotting of the lens and should be verified when received from the lab. Do this before dispensing. Use the lensometer positioning the reticle hairline at 90 degrees and move the center of the target to the point 1.5Δ base down. Confirm the prescription. Again, confirm that the dot is at 6 o'clock when on the patient. Wait approximately 15 minutes for the lens to settle and the tear layer to stabilize. Remember, left-add, right-subtract (LARS) since this lens should be analyzed similar to a soft lens. If the dot isn't at 6 o'clock it needs to be re-ordered with corrected cylinder axis or with more prism ballast, or a steeper/tighter fit if it rotates too much with-the-blink.
EXAMPLE
Prescription: OD -2.50-2.50x180
K Readings: OD 44.00/44.00X090
Lens design considerations: Order the
prescription sphere, cylinder power and
axis from the doctor's prescription.
Include with 1.5Δ ballast and dot
@ 6 o'clock.
Lens ordered:
OD 44.00BC, 9.2 dia., -2.50 -2.50 x 180,
1.5Δ prism ballast, dot @6:00 Blue
Back Toric: This lens design is rarer than the others and is used when there is a highly toric cornea (3.00D or more) with a spherical correction.
EXAMPLE
Prescription: OD +4.50
K Readings: OD 41.50/46.50 @ 090
Lens design considerations: Fit to the
corneal curves (on K) and order spherical
power from the prescription considering
any vertex change effects.
Power vertex corrected:
+4.50 at 12 mm = +4.75 at 0 mm vertex
Lens ordered:
OD 41.50/46.50 9.2 +4.75 Blue
OVER-REFRACTIONS AND FITTING CHANGES
Once the patient has their initial lenses and has been wearing them for the initial week, an evaluation of vision and fit is required. Changing a power or the fit of a toric lens isn't difficult, as long as you keep things straight in your mind what it is you are correcting and why. We'll use the example for a bitoric from above to simplify things.
EXAMPLE 1
The lens need is strong by 0.50D.
First Lens: Bitoric, -3.25/42.75 -6.50/46.75
9.2 dia. Blue
• Over-refraction, +0.50 sphere
• Add the power to both meridians
using the same previous curves.
Remake Order: -2.75/42.75 -6.00/46.75
9.2 dia. Blue
EXAMPLE 2
The bitoric lens looks too loose so it needs to be steepened to "tighten" its fit. If -0.50D steeper works to reduce excessive movement and the power was excellent, we'll want the same corrective power as before. Therefore, we will need to compensate for the change in the tear lens to keep the same power. Keep in mind the rule Steeper Add Minus (SAM) and Flatter Add Plus (FAP). Look closely and notice that we have to change both curves and compensate for the tear lens for both curves.
First Lens: Bitoric -3.25/42.75 -6.50/46.75
9.2 dia. Blue
• Fit -0.50D steeper to tighten the fit.
Remake Order: -3.75/43.25 -7.00/47.50
9.2 Blue
EXAMPLE 3
Using the lens from the first example let's say that we need to both steepen the fit by -0.50 and change the power by +0.50 sphere. Do each step at a time carefully.
First Lens:
• -3.25/42.75 -6.50/46.75, 9.2, dia. Blue
• *Steepen fit -0.50D
• -3.75/43.25 -7.00/47.50 9.2 Blue
(Steepening the fit adds +0.50D to the
tear lens so change the lens power by
-0.50D, SAM)
• Power check shows that an over-refraction of +0.50D is needed also
Remake Order: -3.25/43.25 -6.50/47.50,
9.2, Blue
EXAMPLE 4
Lens from first example needs a spherical-cylinder over-refraction.
First Lens: -3.25/42.75 -6.50/46.75
9.2 dia. Blue
• Over-refraction: -0.50-0.75x180.
• Add the first power to the first set and
the second to the second keeping the
same base curves for the same fit.
Remake Order: -3.75/42.75 -7.25/46.75
9.2 Blue
For other types of toric lenses the process is similar, keeping in mind that these lenses are rarely seen unless you work in a practice that specializes in contact lenses. If the over-refraction is a cylinder at an axis other than the original, this creates a resultant cylinder problem. There is a good tool at opticampus.com for resolving two cylinders at different axes.
 IDENTIFYING TORIC LENSES
When a new patient visits and wears RGP contacts, verify if they are toric. Using a lensometer, check the power. Then with a radiuscope check curvature.
Power: Is it spherical or cylindrical (two powers) using a lensometer? Don't worry about axis alignment unless the lens is dotted. This could indicate that the lens is a right lens unless the lens is ballasted, and the dot is at 6 o'clock when it's on the patient.
Curvature: Radiuscope readings would show two distinctly different curves. Make sure that the lines are sharp. If the lens is toric the values for the two curves will be distinct. If there are two values but blurred and indistinct, the lens is most likely warped and not toric. Confirm the location of the toricity on the lens. Be aware that the radiuscope only reads the back curvature of the lens (base curve) and the lensometer will tell you whether there are two powers.
Sphere/Single cut = Spherical Power/1 Curve
Bitoric = 2 Powers/2 Curves
Front Toric = 2 Powers/1 Curve.
Back Toric = 1 Power/2 Curves
For front toric lenses, the lens may or may not have a dot on it as they come off when polishing or after a year or two from daily cleaning. You must know the cylinder axis from the prescription to verify and re-dot the lens. This is very tricky without a lens holder of some sort. Fortunately, these lenses are rare but the author has had to verify and do this several times over the years, and the sense of accomplishment when you have done your first one will be one of the signs that you have reached an advanced stage of fitting expertise.
CONCLUSION
A clear understanding of the different RGP lens designs and a close evaluation of both the prescription and keratomer readings will help to quickly identify which lens design to use for each situation. Careful changes to the lenses from over-refractions and curve changes will help confirm a growing expertise.