
More Sales, Less Effort – Part 1
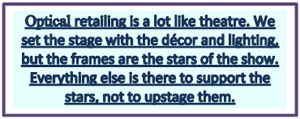
The Elements of Visual Merchandising
By Barbara L. Wright, CID, Barbara Wright Design
Release Date: June, 2012
Expiration Date: June 1, 2017
Learning Objectives:
At the conclusion of this course you should be able to:
- Understand the principles of display design and the elements of eyewear display.
- Learn the keys to effective merchandising for rigid or flexible displays.
- Understand the power of eye level display.
Credit Statement:
This course is approved for one (1) hour of CE credit by the American Board of Opticianry (ABO). Course # SWJMI246-1
 What Is Visual Merchandising and What Can It Do For Me?
The art of displaying merchandise to enhance its sales appeal is called "visual merchandising." In-store visual presentation is accountable for the majority of retail purchases according to Joseph Weishar, author of The Aesthetics of Merchandise Presentation (2005, stmediagroup.com/stbooks). Although eyewear distributors spend millions advertising their brands to consumers, the way you present their products in your optical dispensary can make or break your sales results and theirs.
Effective eyewear displays meet all of these four basic shopper/patient needs. Merchandise 1. Is easily seen, 2. Is touchable and accessible, 3. Has enough choices but not too many and 4. Has clear visual cues to price and value.
Why Is Eyewear Display Difficult?
 Eyewear is different from other fashion products like clothing, shoes or handbags that have
lots of mass and color. It is more like jewelry with little mass, lots of fine delicate details and
subtle colors and materials that need to be seen up close to be appreciated. From a distance
all frames look alike.
Therefore, we have to entice the patient or shopper to come within arm's length of the
frames before they can begin to distinguish the defining details and colors. The overall look
and feel of the retail area has to attract their
attention and convince them that there are
frame styles here worth a look.
Eyewear is different from other fashion products like clothing, shoes or handbags that have
lots of mass and color. It is more like jewelry with little mass, lots of fine delicate details and
subtle colors and materials that need to be seen up close to be appreciated. From a distance
all frames look alike.
Therefore, we have to entice the patient or shopper to come within arm's length of the
frames before they can begin to distinguish the defining details and colors. The overall look
and feel of the retail area has to attract their
attention and convince them that there are
frame styles here worth a look.
Challenge #1: High Quantities of Product to Display
The average eye care practice displays 500 to 800 frames and many have well over 1,000. However, the average human being's short-term memory can only comfortably hold about seven items at any one time. Is it any wonder that when confronted with on wall-to-wall frame boards people get overwhelmed with too many choices? Displaying hundreds of small items in ways that persuade the customer to buy is no easy task even for a seasoned display professional. The good news about eyewear display is that you can almost always do better by having less peripheral "stuff" around. The mark of a "beginner" visual merchandiser is doing and having too much: using too many props, too many show cards, crowding far too many frames into a showcase or window display.
 Challenge #2: Inadequate Lighting
Optical dispensaries commonly suffer from inadequate lighting. Even luxury eyewear can look cheap if it is not properly lighted. Like jewelry it needs intense perfectly color-balanced white light aimed precisely at the top and front of the product. Halogen light bulbs with a color temperature rating of 3500 Kelvin are a good choice for optical track lighting because they bring out the sparkle and rich colors of eyewear and are relatively inexpensive. The drawback is that halogen lighting produces quite a bit of heat and requires lamp replacement two or three times per year. LED (Light Emitting Diode) track lighting with a rating of 3000K to 3500K can provide bright enough lighting if you invest in a high-output LED fixture.
The initial cost of LED lighting is higher than halogen, but the lamps can last five years or longer and do not cause heat build-up as halogens do. Linear LED's above each shelf are good for showcase lighting. Less expensive LED lighting produces an unattractive blue-tinged light. Get professional advice if you decide to switch to LED and be prepared to spend more for the right product. It will more than pay for itself over the long term because it will be five years or more before you replace the lamps. If your lighting needs improvement, adding halogen or LED track lighting can make a big difference.
Basic Principles of Eyewear Display
You don't have to be an artist to create effective displays. The art of display lies in creating visual impact through elegant simplicity. Try putting just a few of these eyewear display principles into action and you'll gain more sales with less effort.
Eye Level Is Buy Level - This is the universal granddaddy retail display principle of them all. It applies to all types of merchandise the world over from Middle Eastern bazaars to Manhattan boutiques. Merchandise displayed at eye level gets noticed more and sells more. There are six vertical height zones for displays, but only four of them work for eyewear. Zones 1 and 6 are not effective for eyewear. Zones 2 and 5 can work with the right kind of frame holders. Zones 3, 4 and 5 are the "sweet spot" for display. (See Eyewear Display Zones illustration.)
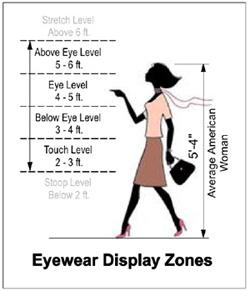 Stretch Level: above 6 ft. This is the least valuable display zone. Products placed
above this height get little attention from shoppers. Signs and graphics work well above this height because they can draw shoppers from a distance to look at product
displayed below.
Stretch Level: above 6 ft. This is the least valuable display zone. Products placed
above this height get little attention from shoppers. Signs and graphics work well above this height because they can draw shoppers from a distance to look at product
displayed below. - Above Eye Level: 5 - 6 ft. Frames can be displayed successfully on shelves within this level if you use tiered displays that present the frames parallel to the wall or at a slight downward angle allowing the frame to face the shopper who is looking up at it.
- Eye Level: approximately 4 - 5 ft. Products placed at eye level sell best, so this is where to place your highest margin, most popular styles. One study found that eye level merchandise received 35% more attention than products on lower shelves.
- Touch Level: 3 - 4 ft. This level is approximately at a shopper's waist height, below eye level but within easy reach. This zone is second in terms of shopper attention-still a good place for high margin merchandise.
- Below Touch Level: 2 - 3 ft. Frames can be displayed as low as 2 feet above the floor if they are on a countertop or shelf facing up.
- Stoop Level - less than 2 ft. Most shoppers don't like to bend down, so this zone is the retail equivalent of the boondocks, relegated to low-margin products. Keep all your merchandise above the 2-foot level. Many offices use the space below two feet for cabinets to store back fill inventory.
Organize Categories Vertically - The majority of our eye muscles are meant for horizontal movement. Customers first scan any store horizontally for visual clues about where products of interest might be found. Then they walk closer to the wall or showcase that caught their attention and scan vertically for individual products. This means that merchandise categories (Men's, Women's, Children's, Sunglasses, etc.) are best organized in vertical sections, not horizontal ones.
 Display Principles for Walls
Back Wall Principle - In a storefront location people driving or walking by can only see what is on the back wall that is parallel to the front windows. They cannot see any merchandise that is on the sidewalls (perpendicular to the sidewalk), but they CAN see what is on the back wall of your retail area (parallel to the sidewalk) even if it is 40 or 50 feet away from your front window. Therefore, the back wall should have merchandise or a graphic image that catches their attention immediately and shows them what you have for sale. Eye care practices often miss the boat by locating the reception counter on the back wall with all the frames on the sidewalls where no one can see them unless they step in to the space. That makes it look like an office where you have to have an appointment, not an intriguing place to shop for eyewear. Make sure that they can see what you are selling on the back wall, not a reception counter or patient files.
Wall Placement For Frame Boards and Shelves
Frame boards usually show frames just one-way: facing out perpendicular to the floor. Shoppers can't easily see the frames at the very top or very bottom of a frame board. Mount your frame boards so the lowest frame is at least 27" above the floor and the highest frame no more than 69" above the floor. Shelves give you more flexibility. You can find many different frame pedestals and holders available to present frames at different angles, so you can use more of the vertical wall space. Shelves (or countertops) can be installed as low as 24" above the floor and as high as 68" above the floor. You'll have effective displays as long as you choose the right kind of frame pedestal or holder for the different height zones. Allow 12" to 15" of vertical space between shelves. For maximum flexibility install adjustable height glass shelves so they can move up or down to accommodate different display props.
 Display Principles for Showcases and Shelves
Less Is More - Keep your displays simple. Keep them uncluttered. The most common mistake is showing too many items at the same time. Props should be simple in shape, preferably something that provides a large mass of color or texture, such as blocks, covered boxes or risers. Stay away from things with busy details, such as printed scarves.
Pyramid Principle - Place one frame at the highest point of the display and let all the other elements step down from that point like a pyramid. This is a very effective type of display that you'll see used in department stores all the time.
Odd Rather Than Even- An odd number of elements is always more attractive to the eye than an even number. That's because an asymmetrical arrangement is slightly off balance and keeps the eye moving around to look at each frame, providing a built-in visual dynamic. A symmetrical, perfectly balanced arrangement stops the eye in its tracks. That's dull.
Repetition - Using identical elements and repeating them over and over again creates a very powerful display. This simple idea can have a lot of punch. For example, line up a series of frames that are all the same style but different colors. Position all exactly the same way or the display loses impact. An additional benefit to this type of display is that it reinforces the idea that you have a wide selection of frames.
 Contrast - Choose display background materials that contrast with the frames you are
showing. Never put metal frames on a mirror or other glossy surface. The frames will get lost in all the reflections. Metal frames need a richly textured
surface like velvet or suede to bring out their jewelry-like
qualities.
Contrast - Choose display background materials that contrast with the frames you are
showing. Never put metal frames on a mirror or other glossy surface. The frames will get lost in all the reflections. Metal frames need a richly textured
surface like velvet or suede to bring out their jewelry-like
qualities.
Breathing Room - Get comfortable with leaving some empty space in your luxury brand displays. Expensive frames must never be crowded together—it reduces their perceived value. Leave open space around high end frames to communicate luxury and quality.
Do crowd low-end frames together because that communicates their lower price. Think about a flea market. All the merchandise is jammed together, filling every available space. You expect to find some terrific bargains—your optical customers will expect the same when they see frames crowded together.
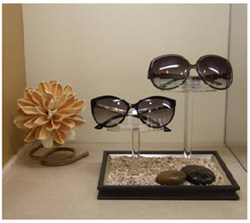
Lift and Present - Always use frame pedestals, holders and other display props to lift frames above the horizontal surface of the shelf or counter and present them at the most attractive angle to the shopper. Don't let folded frames just lie on shelves-they look dead, uninteresting and worst of all, cheap.
Elements of Eyewear Presentation
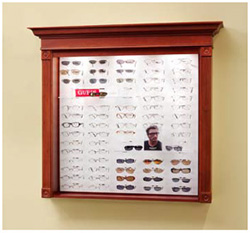 Rigid displays have frame holders that are equally
spaced out on a panel or attached to an acrylic rod and
cannot be moved. Frame boards and frame bars are the
most common type of rigid frame display.
Rigid displays have frame holders that are equally
spaced out on a panel or attached to an acrylic rod and
cannot be moved. Frame boards and frame bars are the
most common type of rigid frame display.
Advantages: Frames stay neatly in place. It's easy for patients to put frames back in place after try-on and easy for opticians to quickly fill empty spots as frames are sold. They are low maintenance, minimal dust collectors and work best for low to moderate priced frames.
Disadvantages: Difficult to highlight brands or call attention to special styles. They make high end frames look low end. Does not differentiate brand, quality or price.
Flexible displays like shelves, tables and showcases provide space to "romance the frames" with. Use Point Of Purchase (POP) display props from vendors to show smaller groups of frames by brand or style.
Advantages: Frames have higher perceived value and enhanced sales appeal because their individual style and brand gets noticed. Inventory levels can shrink and expand without telltale "empty spots." Works best for moderate to high priced frames.
Disadvantages: Takes more time to set up and maintain displays. Requires a variety of frame pedestals and holders. Patients may not replace frames properly after try-on. Requires regular dusting and cleaning.
Backgrounds -The best background colors for eyewear display are white or a very light ivory (off-white). Dark colors and dark stained wood are poor choices as a background for most frames because they do not provide enough contrast and the frames don't "pop." White backgrounds contrast well with nearly all types of frames except white zyl or rimless. A white background bounces the light around so you can see the smallest details and true colors of the frame design.
 There is one exception: Rimless frames show better on a black background. The easiest
way to provide that background is with a
black display prop. (See black house
display)
There is one exception: Rimless frames show better on a black background. The easiest
way to provide that background is with a
black display prop. (See black house
display)
Mirrors are always a poor choice for display backgrounds. Mirrors absorb the light and make the frame displays appear twice as cluttered and confusing. Let your mirrors be for patients to see themselves and nothing else.
Communicating Price Levels
Use one-glance, merchandising techniques, to give clear visual cues to price levels. One glance into your optical dispensary should tell the patient where they could find a frame in their desired price range or quality level. Price level is communicated visually by how you display the frames. Crowd your lowest price frames together on a rotator, on frame boards, or in plastic trays kept in cabinets below displays. Show low to moderate priced frames on frame boards or frame bars attached to the wall.
Intersperse some shelves among moderate frames to feature the most sought-after brands. Most Opticals benefit from a mix of both rigid and flexible displays. With only rigid displays an optical looks boring and low-end. It has no way to highlight name brands or easily shrink and expand total inventory.
 When an Optical has only flexible displays it conveys an atmosphere of high quality
merchandise and pricing to match. With both types of display it's easier to communicate a
wide range of prices and demonstrate the ability to serve a wide range of customers.
Create a distinctly different display area for your highest priced frames. Present them in
locked showcases or on open shelves if theft is not a worry. Identify the designer brands and
show all the pieces in the collection together.
When an Optical has only flexible displays it conveys an atmosphere of high quality
merchandise and pricing to match. With both types of display it's easier to communicate a
wide range of prices and demonstrate the ability to serve a wide range of customers.
Create a distinctly different display area for your highest priced frames. Present them in
locked showcases or on open shelves if theft is not a worry. Identify the designer brands and
show all the pieces in the collection together.
Elementary Dear Watson
An effective optical retail environment sends a clear accurate message to customers and patients about the quality, value and prices they can expect. Whether you are looking to improve your existing optical or opening a brand new one the key to effortless merchandising is to plan the right mix of display fixtures, props and lighting before you start. In Part 1 you learned the principals and elements of eyewear display. Part 2 will uncover the proper use of POP (Point Of Purchase) materials and show you how to put it all together to create powerful visual merchandising in your office.