
THE EYEWEAR TUNE-UP
By Preston Fassel, BS
Release Date: September 1, 2015
Expiration Date: September 16, 2017
Learning Objectives:
Upon completion of this program, the participant should be able to:
- Understand the concept of the Eyewear Tune-Up and how it can benefit one's practice and the reputation of brick-and-mortar opticians.
- Understand the basic steps of an Eyewear Tune-Up and how it can improve the usefulness and longevity of a pair of glasses.
- Learn/refresh oneself on the steps of bench alignment.
Credit Statement:
This course is approved for one (1) hour of CE credit by the American Board of Opticianry (ABO). General Knowledge Course SWJH417

Faculty/Editorial Board:
Preston Fassel is an optician in the Houston area. His interests are in the history of eyewear and all things vintage. He writes for The Opticians Handbook and 20/20 Magazine, and has also been featured in Rue Morgue magazine, where he is a recurrent reviewer of horror and science fiction DVDs.
Time was, going to get gas was an experience.
Today, you arrive at the pump, swipe a card, do the bobble-head if you're wearing polarized sunglasses, go through an annoying numbers-punching process, turn down multiple offers for car washes, and, after all of that frustration, you're finally permitted to fill up. Odds are, you don't have any particular brand loyalty; you see you're running low, you find a gas station, and after the hassle, go on your merry way.
That's not the way it used to be, though. Time was, a gas station was a service station. You'd arrive at the pump, and your tires would roll over a trigger switch that would “DING DING.” At the signal, a little guy—maybe wearing a little flat hat—would jaunt up to your car with a greeting: Maybe gruff, maybe pleasant, but he was THERE, and he was THERE to provide that service. He'd fill your tank; he'd wipe your windshield; he'd check your oil. By the time you pulled out of that service station, you had not only refueled, but you had gone through a brief quality check to help ensure the livelihood, drivability and comfort of your automobile.
Now which scenario best describes the state of modern optical?
The first, of course, is how most patients probably perceive their glasses buying experience: They arrive at a dispensary, pick out a pair of frames and pick from a list of lens options. For many, it's an anonymous, automated process, one where little is remembered and quickly being supplanted by tech-savvy online entrepreneurs.
What if it was that second scenario that was more directly in parallel to the modern optical experience? What if, instead of feeling like they were stopping in for a quick gas-up, patients felt like they were coming in for that full-service check a number of times between those new pairs of glasses or only when they were having a problem?
ENTER THE EYEWEAR TUNE-UP
The Eyewear Tune-Up is a quick, efficient way to differentiate your dispensary or practice from others the next time a patient comes in for an adjustment, or even just as an added extra during a yearly exam. It's an opportunity for you to demonstrate your abilities, remind the patient that you're more than just a salesperson, and give them something to think about the next time they need eyewear and are lured by the perceived value of online optical.
TUNE-UP, WHEN?
Figure 1. Propeller Acetate
The Eyewear Tune-Up begins the same way as the service checks of old: with the ringing of a little bell. In this case though, it's the bell that signals you that someone has just come through your front door (and if you haven't got one of those, you really ought to). Greet the patient as cheerfully as you normally would and listen to his/her reasons for coming to your office. If they're there for an exam, new eyewear, or the need for a repair or adjustment, that's your cue. After sitting the patient down, explain that you offer an Eyewear Tune-Up: a full-service process to clean, adjust, repair and align a pair of glasses to bring them back as close as possible to off-the-wall condition. Schedule them (via e-mail or text) every six months for newly sold or repaired eyewear. For those on your customer/patient list, send an invite. It's up to you whether you'll charge for this service or not: Some patients, used to the free service offered by many opticals (especially chain and big box), may be put off by being charged, while others may be eager to pay for the above-and-beyond service. This is really at your discretion.
If you do decide to charge, one consideration is offering a first-time-free Tune-Up for newly purchased eyewear (within one year), and then charging for subsequent service, once the patient has been given the opportunity to experience your expertise. Listing the costs for a Tune-Up places a value on your time and expertise; it also teaches those that bought eyewear from others or online that services aren't usually free. Ultimately, the decision relies on your extant philosophy on charging for repairs or adjustments.
Lastly, be sure to discuss the possibility of breakage to the frames during the process, especially if the eyewear is old, poorly made or particularly expensive. What sort of concessions, if any, are you willing to make in the event of damage incurred to the eyewear?
Once these issues are out of the way, and the patient has agreed to the Tune-Up, you can really begin. Have the patient put on his or her eyewear and ask if there are any specific complaints: too tight, too loose? Pain in the nose, behind the ears? Record the answers on a pad, and then thoroughly inspect the fit. Ask for permission to feel around the temples, bridge and eyewire, and see if you can identify any problem points. As you do, point out the correlation between your findings and the patient's complaints. It's a simple yet powerful demonstration of knowledge that will help put the patient at ease about your abilities.
Once this initial inspection is complete, have the patient remove the frames and hand them over to you. Now it's time for a secondary examination of the frames themselves. Are the temples cracked? Are the nosepads coming apart? Are they dirty or fogged enough to warrant replacing? Is the eyewire still shiny? Are the edges of the acetate gunked up with that freaky green stuff that looks like it belongs in a '50s B-movie? Are there loose screws? In addition to fit and comfort issues, discuss these matters of frame hygiene and “well-being,” so that when you present your patient with his or her brand-new-but-not-really Tuned-Up frames, the change will be all the more apparent and appreciated.
Lastly, during your inspection, be sure to identify and point out any extant, non-repairable damage, especially lens scratches and damage to AR. This is more of an insurance policy for yourself, so that the patient doesn't believe that you've caused any damage to the frame during the Tune-Up process.
CLEAN, CLEAN
Figure 2. Rimless Propeller
Now…onto the Tune-Up itself.
The first step is to clean the glasses—not only is it part of the Tune-Up service, but it also diminishes the amount of time you're having to handle a pair of nasty frames that have been through who knows what. (An anecdote to encourage this step: I once had a patient bring in her mother's frames to have a screw replaced because her mother couldn't be there herself. While replacing the screw, I noticed a brownish, crusty substance coming off the lenses and onto my hands. When I inquired about it, the woman told me the reason the glasses were broken and her mother couldn't come was because she'd fallen down a flight of stairs, split open her head and was having staples put in. Moral of the story: Always clean the glasses first).
When cleaning the glasses, it may be necessary to disassemble them for a number of reasons. First and foremost, your office might stock an ultrasonic cleaner which is not safe for use on eyeglass lenses. In this age of high-tech ARs, lenses are both more durable and more susceptible to damage than ever: While lenses are more resistant to scratches and dings, they've also got a new Achilles heel in the form of chemical damage, which can be rendered by the ammonia found in many cleaners or the chemicals in “grime removing” cleaners. As a precaution, it's probably best to simply disassemble the glasses prior to cleaning. Not only does it prevent lens damage, it also allows for the most thorough possible cleaning inside the eyewire; it'll also get gunk out of nosepad mountings on wire rims and rimless, and ready them for replacement later.
Be sure you know the frame material before you begin: Acetates require heat, polyamides very little heat and some materials (such as nylon) are cold insert. Metals like monel and gold-filled are easily adjusted, while others like titanium may be more difficult to work with (but also get out of adjustment less easily).
Once the glasses have been disassembled, put them into the ultrasonic cleaner; three minutes ought to do it. This gives you the opportunity to clean the edges of the lenses and also gives them a nice wipe-down. Use an AR-safe lens cleaning spray and a microfiber cloth to get rid of the smudges, dirt and edge gunk.
Once the cleaning process is complete, dry everything off, replacing any nosepads or temple pieces along the way. Now that the frames and lenses are free of grime, reinsert the lenses, and the bench alignment process can begin.
WHEN IT'S GOOD TO BE A BENCHWARMER
Figure 3. Faceform shape acetate
The bench alignment is the factory preset of eyeglasses—how a pair of frames is meant to look out of the box when they go on your frameboard, so that they're appealing to the eye and will sit properly for display. By putting the frames back into bench alignment, you're not only preparing them to present to your patient as “almost brand new,” but you're also putting them back into the shape they'd have been when your patient purchased the glasses in the first place, essentially letting you adjust them again, for the first time.
The first step is to bring the eyewires back into alignment with one another—a maladjustment known as propellering. This is when one of the eyewires is twisted either toward or away from the face, while the other remains stationary or is twisted in the opposite direction. It happens most often to children and elderly patients from falls or by getting hit in the face with a ball or other object. It can also happen simply by falling asleep in them. If you've ever had a patient come in saying that it felt like one of his or her lenses was touching a cheek, there's a good chance this was the issue. If the frames are metal, the process is deceptively simple: Applying the proper amount of force, simply bend the eyewires back into alignment, being careful not to break them in the process.
If the frames are acetate, the process is a bit more delicate. First, heat them in a frame warmer in order to make the bridge more pliable. Take caution if the lenses are AR treated—you may want to leave them out for this step of the process if they are to prevent any damage. Only apply enough heat to make the plastic supple without hurting its structural integrity. If the bridge begins to melt or becomes so soft that the glasses ooze apart when you attempt to adjust the bridge, obviously you've heated them too much, and you've got a lot of explaining to do.
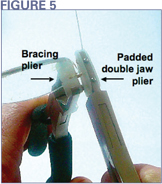
If the frames are rimless, you'll need to use some tools in order to ensure that the mountings don' t break or loosen. In this case, those tools are some nifty-difty bracing pliers. Be sure that your bracing pliers have pads with soft grooves designed to fit neatly and snugly around the shape of most rimless mountings in order to provide the greatest stability without hurting the lenses. You'll quickly learn that two bracing pliers are needed to easily and expertly adjust propellered rimless. Be sure that you grab the frame with the pliers from the top when adjusting; if you grab the lenses from the bottom, your grip might not be as secure, and you'll clip the bottom of the lens between the metal parts of the jaw of the plier. Once the pliers are secure, you can begin twisting the glasses while keeping the mountings secure.
Turn the frames so that you can see the tops and then the bottoms as you adjust with the two pliers if rimless. For acetate, metal and semi-rimless, use your hands, grasping each eyewire firmly, thumbs next to each other on the back of the bridge.
FACE/OFF
Now it's time to give the frame some face form. Not only will face form help to ensure the optical integrity of the glasses, but it also helps the frame look nice, as well. You want a nice, smooth, even curve across the front of the frame, which leaves the temples tapered slightly inward and also helps to ensure a secure fit. The principles to face-forming a pair of glasses are similar to those you just applied in bench alignment: Gently heat zyl frames, and use bracing pliers on totally rimless. Let your thumbs be both your anchors, planting them firmly on the bridge and stabilizing the rest of the frame as you use the natural curvature of your palms to apply the face form.
Figure 4a. Part Acetate
Figure 4b. Part Rimless
FOUR POINTER
The next step is a four-point touch alignment. Don't worry if you've never heard this term before; it simply means making sure that the temple bends and the tops of the eyewires all touch a flat surface at the same time, ensuring that the pantoscopic angle of the temples to the front is equal.
For metal frames with thinner temples, turn them upside down and lay them on a flat, even surface. If the four points aren't touching, use a parallel and covered plier to slowly bend the endpieces (but not the hinge) until the four points are all in alignment. Check them upside down again. Once they are, take a look at the glasses right-side up on your flat, even surface, and make sure that the bends in the temples are placed evenly; eyewire bottoms and temple ends should all touch evenly. Lastly, close the glasses and make sure that the temples close parallel over one another. If they don't, use pliers to make the proper adjustment to ensure you don't use too much force with your hand. I prefer bent nose pliers myself, as it lets me angle them into the space around the hinges without obstructing my view.
Plastic frame adjustment here is, of course, much more difficult and requires a lot more finesse and patience. Again, you'll want to check the frames upside down, but for frames with thicker temples that obscure the hinges (such as 5 to 7 barrel hinges), check with the temples slightly askew so that you can examine the barrels at the same time. As you know, thick-templed frames often provide little adjustment possibilities for straightening a frame when the patient has different height ears and/or a bridge that skews the frame. An acetate frame with extreme bends to the barrels has a wedge-shaped space where the temple ends butt up against the frame front's endpiece. An endpiece reshaping is required rather than the bending of the barrels of the frame; or filing the temple will be necessary for extreme adjustments so the temple looks correct. If necessary, you'll need to bend the temples in the appropriate direction in order to correct the barrels. Do it slowly and in increments; bending and adjusting acetate frames are more likely to lead to cracking or pulling the hidden hinge right out of the front. The last thing you want to do while showing off your skills and new Tune-Up service to a patient is give them back a broken frame. No one wants to go to the service station for a fill-up and get sugar in the tank.
Like metal frame four-point touch inspection, you'll lastly check the frames right-side up. Heat the temples in order to make adjustments, again working in slow, careful increments to make 45-degree bends for the temple tips.
 The principals for
adjusting a rimless frame
are the same, except
you'll be breaking out
your old friends, the
bracing pliers. You'll
also use a double-padded plier in order to
make the adjustments, again, diminishing
the force from your hands and reducing the
likelihood of breakage.
The principals for
adjusting a rimless frame
are the same, except
you'll be breaking out
your old friends, the
bracing pliers. You'll
also use a double-padded plier in order to
make the adjustments, again, diminishing
the force from your hands and reducing the
likelihood of breakage.
THE ONES THAT GET AWAY
Just as some folks would inevitably pull up to that service station in a tin bucket on its last legs, losing oil like a bloody nose and spewing black exhaust, there are some frames which are beyond hope, or that will take more than a simple Tune-Up to get back in working order. Consider frames with a high number of barrel hinges, like a seven or eighter. Not an impossible fix if those hinges are bent, but nonetheless one of the more difficult and time-consuming processes you'll be faced with. (For the uninitiated: You'll need to individually tweak each and every individual barrel with a pair of duckbill pliers.)
 The early 2000s, in particular, was an era
notorious for producing difficult, if not
impossible to adjust frames. Consider the
metal frame style that was briefly popular in
that decade which featured lenses with a
finger-high B-measurement and thick temples, which ran the width of the eyewire.
Though I hate to say it, some frames are
simply lost causes. Know when to recognize
these frames, or any frame style/design that
may be beyond your capabilities to adjust.
Not only will it save you time and energy,
but also potentially spare you the fallout of
inadvertently damaging or breaking a frame
that was beyond yours—or anybody's—ability to adjust.
The early 2000s, in particular, was an era
notorious for producing difficult, if not
impossible to adjust frames. Consider the
metal frame style that was briefly popular in
that decade which featured lenses with a
finger-high B-measurement and thick temples, which ran the width of the eyewire.
Though I hate to say it, some frames are
simply lost causes. Know when to recognize
these frames, or any frame style/design that
may be beyond your capabilities to adjust.
Not only will it save you time and energy,
but also potentially spare you the fallout of
inadvertently damaging or breaking a frame
that was beyond yours—or anybody's—ability to adjust.
AS YOU COLLECT FOR THE TUNE-UP
And...there you have it. You've just completed your eyewear Tune-Up. All that's left is to perform a standard adjustment process to fit the frames to the patient's head. Ready to impress? Make a statement? Strike a blow for brick-and-mortar opticianry? Then go out there: Will that be regular, unleaded or premium?